Extended ACL lab using packet tracer step by step guide


Extended ACL lab using packet tracer


In this article we will  learn about what is extended Aclconfiguration of extended acl and verify the configuration  using packet tracer.


What is Extended ACL


 In extended acl  network admin permits or deny the network  traffic using 
several criteria which includes source and destination ip address,protocol and source and destination port no.This acl must be placed closest to the source. Range of extended  acl is <100-199>.

Lab Diagram


Extended ACL lab using packet tracer


In the above diagram we have done a simple lab setup.
Agenda of the lab are:
  • ·         Pc0 can access the both servers.
  • ·         Pc1 can not access both webservers.

We will do these configuration using extended acl through packet tracer.


Configuration of Extended acl


Ip address of the inside network 192.168.1.0/24  and ip address of the outside network  172.16.0.0/24. After assign the ip address of the devices which is located at inside and outside premises, we will configure extended acl on router. For configuration extended acl we need to follow the below steps. 


Router(config)#access-list 101 deny ip host 192.168.1.2 host 172.16.0.2

Router(config)#access-list 101 deny ip host 192.168.1.2 host 172.16.0.3 
Router(config)#access-list 101 deny ip host 192.168.1.3 host 172.16.0.2
Router(config)#access-list 101 deny ip host 192.168.1.3 host 172.16.0.3
Router(config)#int gigabitEthernet 0/0
Router(config-if)#ip access-group 101 in


Verify Configuration of Extended acl


Before doing the  configuration pc1 can access both servers. When we ping webserver1 and webserver2 from pc1we found the below output.

C:\>ping 172.16.0.2

Pinging 172.16.0.2 with 32 bytes of data:

Request timed out.
Reply from 172.16.0.2: bytes=32 time=17ms TTL=127
Reply from 172.16.0.2: bytes=32 time=15ms TTL=127

Ping statistics for 172.16.0.2:
Packets: Sent = 4, Received = 3, Lost = 1 (25% loss),
Approximate round trip times in milli-seconds:
Minimum = 15ms, Maximum = 17ms, Average = 16ms

C:\>ping 172.16.0.3

Pinging 172.16.0.3 with 32 bytes of data:

Request timed out.
Reply from 172.16.0.3: bytes=32 time=16ms TTL=127
Reply from 172.16.0.3: bytes=32 time=15ms TTL=127
Reply from 172.16.0.3: bytes=32 time=29ms TTL=127

Ping statistics for 172.16.0.3:
Packets: Sent = 4, Received = 3, Lost = 1 (25% loss),
Approximate round trip times in milli-seconds:
Minimum = 15ms, Maximum = 29ms, Average = 20ms

After the configuration of extended acl on router when we going to communicate servers form pc1 we got the following output.

C:\>ping 172.16.0.3

Pinging 172.16.0.3 with 32 bytes of data:

Reply from 192.168.1.1: Destination host unreachable.

Ping statistics for 172.16.0.3:
Packets: Sent = 4, Received = 0, Lost = 4 (100% loss),

Conclusion


In this article we have  learned about what is extended Acl , configuration of extended acl and verify the configuration  using packet tracer.


Configure port security on cisco switch using packet tracer via switch port step by step guide


Port Security On Cisco Switch |In this article we learn about configure port security on cisco switch. It is very important to enhance network security .any persons can intestinally do any harmful activity as normally by default all ports are  open on the cisco switch. To prevent it network admin bind the mac address  to the switch port and set the violation mode.

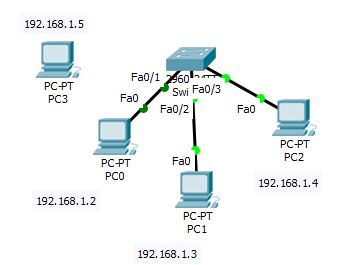
Lab Diagram


Configure port security on cisco switch using packet tracer via switch port


In the above diagram pc0,pc1 and pc2  are sequencially connected to fa0/1,fa0/2 and fa0/3 of the switch. When we are going to connect pc3 to fa0/1 port of the switch as per the configuration the port fa0/1 will be shutdown.

Configuation port security on cisco switch

Now this is time to configure port security on cisco switch.
Switch#conf t
Enter configuration commands, one per line. End with CNTL/Z.
Switch(config)#int fa0/1
Switch(config-if)#switchport port-security maximum 1
Switch(config-if)#switchport port-security violation shutdown
Switch(config-if)#switchport port-security mac-address sticky
Switch(config-if)#exit

Verify the Configuation of port security on cisco switch

To verify the configuration of port security on cisco switch execute the following command . After executing the command we get the mac address.

Switch#show mac-address-table
Mac Address Table
-------------------------------------------

Vlan Mac Address Type Ports
---- ----------- -------- -----


From the above output we don’t get any output. After do pinging from pc0 to pc1 we get the output the of the mac-address-table.


Packet Tracer PC Command Line 1.0
C:\>ping 192.168.1.3

Pinging 192.168.1.3 with 32 bytes of data:

Reply from 192.168.1.3: bytes=32 time=15ms TTL=128
Reply from 192.168.1.3: bytes=32 time=1ms TTL=128
Reply from 192.168.1.3: bytes=32 time<1ms TTL=128

Ping statistics for 192.168.1.3:
Packets: Sent = 4, Received = 4, Lost = 0 (0% loss),
Approximate round trip times in milli-seconds:
Minimum = 0ms, Maximum = 15ms, Average = 4ms

After executing the pinging from pc0 to pc1 we the mac address table output

Switch#show mac-address-table
Mac Address Table
-------------------------------------------

Vlan Mac Address Type Ports
---- ----------- -------- -----

Switch#show mac-address-table
Mac Address Table
-------------------------------------------

Vlan Mac Address Type Ports
---- ----------- -------- -----

1 0002.16c5.9b76 DYNAMIC Fa0/1
1 0060.5c47.175d DYNAMIC Fa0/2


When we are going to connect pc3 to fa0/1 port of the switch due to exceed the maximum limit the port will be violated and shutdown. Thats why  when we are trying to ping from pc3 to pc1 we get the “request time out” output.

If this article is useful to know about Port Security On Cisco Switch please share and subscribe it


Directory Management Of Linux/unix with practical guide


Directory Management Of Linux/unix with practical guide


In this article we learn about directory management that is how to create,rename and delete of directory of linux system. All datas are located in the file and all files are located inside the directories and all directories located inside the file system of the linux machine.

What is home directory

Home directory is user own directory when a user login first time ,after login user place its home directory. User can switch its home directory using ~ sign.Suppose user bob wants to go his home directory he should execute the below command to enter his home directory.

#cd ~bob

To identified the position  of file we should know the concept of pathname. Pathname is divided into two types.
  •          Absolute path: Absolute path is the path which has a relation to root.Absolute path start with /.
  •          Relative path: Relative path is the path which has no relation to root. Relative path never start with /.

To know the current working directory we have to execute the ‘pwd’ command on the shell.

# pwd
/root

List the file in linux system

To list the directory in the linux system execute the ‘ls’ command.

[root@localhost ~]# ls
anaconda-ks.cfg  install.log  install.log.syslog  test

Create directory in linux system

 To create a directory we use ‘mkdir’ command. After executing the command we can get the below output.


[root@localhost ~]# mkdir test
[root@localhost ~]# ll
total 24
-rw-------. 1 root root  1044 Aug 31 15:32 anaconda-ks.cfg
-rw-r--r--. 1 root root 10544 Aug 31 15:32 install.log
-rw-r--r--. 1 root root  3091 Aug 31 15:27 install.log.syslog
drwxr-xr-x. 2 root root  4096 Sep 26 16:04 test

Directory Management Of Linux/unix with practical guide


Rename directory in linux system 


To rename the directory we execute ‘mv ’ commad. After executing the command we can get the below output.

[root@localhost ~]# mv test newtest
[root@localhost ~]# ll
total 24
-rw-------. 1 root root  1044 Aug 31 15:32 anaconda-ks.cfg
-rw-r--r--. 1 root root 10544 Aug 31 15:32 install.log
-rw-r--r--. 1 root root  3091 Aug 31 15:27 install.log.syslog
drwxr-xr-x. 2 root root  4096 Sep 26 16:04 newtest

Change directory in linux system 


To change the directory we execute ‘cd’ commad. After executing the command we can get the below output.

[root@localhost ~]# cd newtest/
[root@localhost newtest]# pwd
/root/newtest

Delete directory in linux system 


To delete the directory we execute ‘rmdir’ commad. After executing the command we can get the below output.

[root@localhost ~]# rmdir newtest/
[root@localhost ~]# ll
total 20
-rw-------. 1 root root  1044 Aug 31 15:32 anaconda-ks.cfg
-rw-r--r--. 1 root root 10544 Aug 31 15:32 install.log
-rw-r--r--. 1 root root  3091 Aug 31 15:27 install.log.syslog

File Management Of Linux/unix with practical guide


File In Linux | In this article we learn about file management that is how to create,copy,rename and delete of file  of linux system. All datas are located in the file and all files are located inside the directories and all directories located inside the file system of the linux machine. It basically created a tree structure.

Type of file in linux system

Normally there are two types of files:
Regular file:All datas, texts, instruction are located in the regular file.

Special file:Special file provides the access of hardware like hard drive, ethenet adapter, CD-ROM. Link file is also special file of linux system.

List the file in linux system

To list the file in the linux system execute the ‘ls’ command and to get the more information we use ‘ls-l’ command .See the below output of the command.
#ls -l
total 36
-rw-------. 1 root root  1044 Aug 31 15:32 anaconda-ks.cfg
-rw-r--r--. 1 root root 10544 Aug 31 15:32 install.log
-rw-r--r--. 1 root root  3091 Aug 31 15:27 install.log.syslog
-rw-r--r--. 1 root root     9 Sep 23 15:01 test1
-rw-r--r--. 1 root root     9 Sep 23 15:01 test2
-rw-r--r--. 1 root root     9 Sep 23 15:02 test3
-rw-r--r--. 1 root root     9 Sep 23 15:02 test4


File Management Of Linux/unix with practical guide

File Management Of Linux/unix with practical guide


  First field: Represent type of file and also represent permission of the file.
·          Second field: Block of memory assigned for the file .
·         Third field: Owner of the file.
·         Fourth field: Group of the file.
·         Fifth field: Size of the file in bytes.
·         Sixth field: Last creation orr modified date and time of the file.
·         Seventh field: Name of the file.


Create file in linux system


To create a empty file we use ‘touch’ command. After executing the command we can get the below output.

[root@localhost ~]# touch test5
[root@localhost ~]# ls -l | grep test5
-rw-r--r--. 1 root root     0 Sep 23 15:10 test5

We also create a file using vi editor.After open the vi editor to enter the edit mode press I and after write some test press wq to sand and quit from the vi editor.


Copy file in linux system


To copy the file we execute ‘cp ’ commad. After executing the command we can get the below output.

[root@localhost ~]# cp test5 test5.bak
[root@localhost ~]# ls -l | grep test5
-rw-r--r--. 1 root root     0 Sep 23 15:10 test5
-rw-r--r--. 1 root root     0 Sep 23 15:15 test5.bak

Rename file in linux system 

To rename the file we execute ‘mv ’ commad. After executing the command we can get the below output.

[root@localhost ~]# mv test5 Test5
[root@localhost ~]# ls -l | grep test5
-rw-r--r--. 1 root root     0 Sep 23 15:15 test5.bak
[root@localhost ~]# ls -l | grep Test5
-rw-r--r--. 1 root root     0 Sep 23 15:10 Test5


Delete file in linux system


To delete the file we execute ‘rm ’ commad. After executing the command we can get the below output.

[root@localhost ~]# rm Test5
rm: remove regular empty file `Test5'? y
[root@localhost ~]# ls -l | grep Test5


If this article is useful to know about File In Linux  please share and subscribe it


Intorduction of ACL(Access Control List)


Intorduction of ACL(Access Control List)

ACL plays very important role to provide network security by blocking network
traffic against the set of rules defined by network administrator. In this article
we will learn about the concept of acl.

What is ACL

Access control list(ACL) is the set of rules that control  to permit or deny
flow of data from the network layer based on the rules which is defined by
network administrator. ACL enhance the network security. defined on router and as well as  firewall. ACL filter the
traffic as per security policy defined by network admin.

ACL should be placed edge
location of the network.

ACL is configured based on three rules:

·         1acl per protocol:We can control the every protocols which is configured on router as well as firewall by acl.

·         1acl per direction:There is two directions one is incoming and other is outgoing which is controlled by acl as per defined rule by network admin. 

·                   ·          1 acl per interface:we can control the interface traffic using acl which is defined by network admin. 


What is packet filter

Packet filter is the method to check the incoming and the outgoing packet in the
network by the set of rules to understand whether these packets are forwarded or
dropped. It is defined on router as well as firewall.


Access Control List,Network Security
Access Control List


Types of ACLS


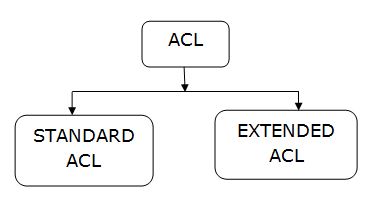
There are two types of acls one is standard acl and other is extended acl.

Standard ACL: In this acl network admin permits or deny the network  traffic using
source address.This acl will be set closest to the destination.Range of this acl is
<0-99>.

Extended ACL: In this acl network admin permits or deny the network  traffic using 
several criteria which includes source and destination ip address,protocol and source and destination port no.This acl should be placed closest to the source. Range of this acl is <100-199>.

Domain Name System


What is Domain Name System

Domain name system is a network service that maps domain name with the
respective ip address. It is hard to remember ip address for the human being
,there is no need to remember ip address because dns resolves ip address with
their respective domain name.


Domain name system
Domain name system

Type of nameservers


There are different type of nameservers:

1)Authoritative nameserver:
·         An authoritative nameserver holds the actual DNS record for a particular domain.
·         An authoritative nameserver answer the queries for part of the zone only.
·         Primary and secondary nameserver both act as an authoritative name server.
·         Minimum one authoritative nameserver will be present in a zone.

2)Primary nameserver:
·         Primary nameserver is an authoritative name server.
·         Primary nameserver holds the master copy of dns record for a domain.

3)Secondary nameserver:
·         Secondary nameserver is also an authoritative name server.
·         Secondary nameserver sync its zone information with the primary master server.
·          
4)Recursive nameserver:
·         Recursive nameserver is not an authoritative nameserver.
·         Recursive nameserver provides the resolution services.
·         Recursive nameserver stores previous queries answer into its cache for a period of time.
·         When recursive nameserver receives any query it searches from its cache memory.If the query answer not present in ithe cache memory it forwards the query to the authoritative name server.