How to define/create link using HTML for beginners


How to define/create link using HTML for beginners


In the previous article we have learnt how to define ordered list using HTML for a web page.


In this article we will learn how to define link using HTML coding. <a></a> tag is used to define the link for a HTML web page and we require a link which is used within the <a></a> tag and to define the link we use href attribute.
Lets check this using one html coding language.

How to define link  using HTML

====================================================================

To define link we use <a> tag ,href attribute like below example.

<!DOCTYPE html>
<html>
    <head>
         <title>Techrideradmin</title>
     </head>
     <body>
            <h1> Welcome to Techrideradmin</h1>
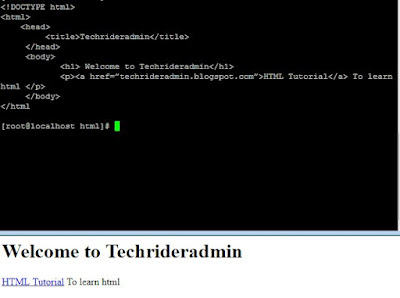
            <p><a href=”techrideradmin.blogspot.com”>HTML Tutorial</a> To learn html </p>
     </body>
</html


After doing the above code while we reload the page we found the below output.
How to define/create link using HTML for beginners


From the above raw coding , we should write <!DOCTYPE html> at the beginning which tells the browser it is a html program.


From the above example <a> tag is used to define link and it should be ebd with </a> tag and we use here href to define our website link.When we click on the HTML Tutorial we redirect our html tutorial web site and it should be write within <body></body> tag.


That’s all. If this article is helpful please share it!!!!


Please Donate To Bitcoin Address: [[address]]
Donation of [[value]] BTC Received. Thank You.
[[error]]

How to define ordered list using HTML for beginners


In the previous article we have learnt how to define unordered list using HTML for a web page.


In this article we will learn how to define ordered list using HTML coding. There are two types of list one is unordered list and other is ordered list. Bullet sign denotes the unordered list and numeric sequence denotes the ordered list.
Lets check this using one html coding language.

How to define ordered list using HTML

======================================================================

Now we are going to write the HTML coding for define ordered list. <ol> is used to define the ordered list and <li> should be define within the <ul></ul> tag which is used to define the items.

<!DOCTYPE html>
<html>
    <head>
         <title>Techrideradmin</title>
     </head>
     <body>
            <h1> Techrideradmin</h1>
             <h2> Programming Tutorial</h2>
             <ol>
                 <li>Shell script</li>
                  <li> HTML </li>
             </ol>
     </body>
</html

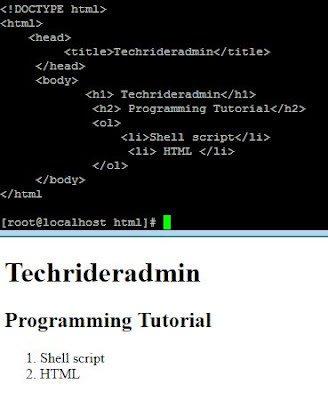
After doing the above code while we reload the page we found the below output.
How to define ordered list using HTML for beginners

From the above raw coding , we should write <!DOCTYPE html> at the beginning which tells the browser it is a html program.

From the above example <ol> tag is used to define the ordered list and <li> tag is used to define the each items,but we have to ensure that <li></li> tag must be within the <ol></ol>tag,otherwise it will give use the error output.


That’s all. If this article is helpful please share it!!!!


Please Donate To Bitcoin Address: [[address]]
Donation of [[value]] BTC Received. Thank You.
[[error]]

How to define unordered list using HTML for beginners


In the previous article we have learnt how to write headings using HTML for a web page.


In this article we will learn how to define unordered list using HTML coding. There are two types of list one is unordered list and other is ordered list. Bullet sign denotes the unordered list and numeric sequence denotes the ordered list.
Lets check this using one html coding language.

How to define unordered list using HTML

====================================================================

Now we are going to write the HTML coding for define unordered list. <ul> is used to define the unordered list and <li> should be define within the <ul></ul> tag.

<!DOCTYPE html>
<html>
    <head>
         <title>Techrideradmin</title>
     </head>
     <body>
            <h1> Techrideradmin</h1>
             <h2> Programming Tutorial</h2>
             <ul>
                 <li>Shell script</li>
                  <li> HTML </li>
             </ul>
     </body>
</html

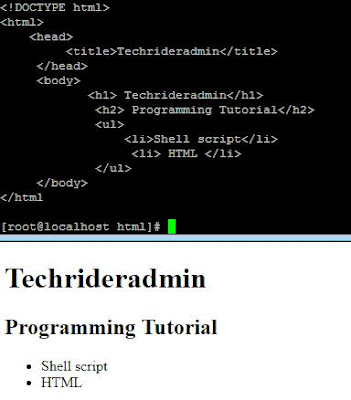
After doing the above code while we reload the page we found the below output.
How to define unordered list using HTML for beginners

From the above raw coding , we should write <!DOCTYPE html> at the beginning which tells the browser it is a html program.

From the above example <ul> tag is used to define the unordered list and <li> tag is used to define the list,but we have to ensure that <li></li> tag must be within the <ul></ul>tag,otherwise it will give use the error output.


That’s all. If this article is helpful please share it!!!!


Please Donate To Bitcoin Address: [[address]]
Donation of [[value]] BTC Received. Thank You.
[[error]]
How to write headings using HTML for beginners


In the previous article we have learnt how to write paragraphs  using HTML for a web page.

In this article we will learn how to write headings of a web page using HTML coding. In the web page we use heading in the content section which should be write in <body</body> section. To write headings ,we use six types of headings from <h1> to <h6> .


<h1> should be write one time as it is main heading of a web page. We can write from <h2> to <h6> headings as per our requirement.

How to write headings using HTML

===================================================================

Now we are going to write the HTML coding for headings.

<!DOCTYPE html>
<html>
    <head>
         <title>Techrideradmin</title>
     </head>
     <body>
            <h1> Techrideradmin</h1>
             <h2> to write sub heading of h1</h2>
           <p> welcome to Techrideradmin</p>
     </body>
</html

After doing the above code while we reload the page we found the below output.

How to write headings using HTML for beginners

From the above raw coding , we should write <!DOCTYPE html> at the beginning which tells the browser it is a html program.

We should ensure that <h1> is the main heading of the web page and it should be write one time and <h2> will be the sub heading of the <h1> and <h3> will be the sub heading of <h2> and so on.


That’s all. If this article is helpful please share it!!!!


Please Donate To Bitcoin Address: [[address]]
Donation of [[value]] BTC Received. Thank You.
[[error]]

How to write paragraphs using HTML for beginners


In the previous article we have learnt how to write page tiltle  using HTML for a web page.

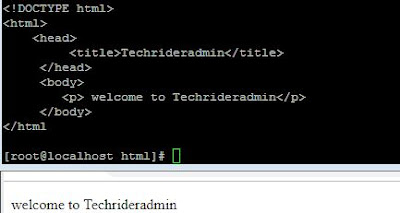
In this article we will learn how to write paragraphs of a web page using HTML coding. In the web page we use paragraphs in the content which should be write in <body</body> section. To write a paragraphs we use <p></p> element.
After write the paragraphs  when browser reloads the page it will display in the content area of the web page.


How to write paragraphs using HTML

========================================================================
Now we are going to write the HTML coding for paragraphs.

<!DOCTYPE html>
<html>
    <head>
         <title>Techrideradmin</title>
     </head>
     <body>
           <p> welcome to Techrideradmin</p>
     </body>
</html


How to write paragraphs using HTML for beginners

After doing the above code while we reload the page we found that page is not empty.On line should will appear in the content area of a web page.

From the above raw coding , we should write <!DOCTYPE html> at the beginning which tells the browser it is a html program.

We should ensure the the <p> element should be write within the <body> tag otherwise the code will be no work .


That’s all. If this article is helpful please share it!!!!


Please Donate To Bitcoin Address: [[address]]
Donation of [[value]] BTC Received. Thank You.
[[error]]
How to write page titles using HTML for beginners


In this article we will learn how to write title of a web page using HTML coding. Title is most important thing for a web page which is defined inside the <head> tag and to write a page title we should use <title> element inside the <head> tag.

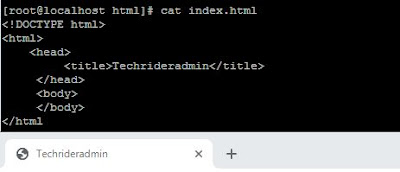
After write the page title when browser reloads the page it will display in the tab section of the web page.

Must Read: Basic Structure of HTML

How to write page titles using HTML

======================================================================
Now we are going to write the HTML coding for page titles.

<!DOCTYPE html>
<html>
    <head>
         <title>Techrideradmin</title>
     </head>
     <body>
      <!—content of the web page -->
     </body>
</html
How to write page titles using HTML for beginners

After doing the above code while we reload the page in the browser tab section we found the title of the page which we have defined that is Techrideradmin.

From the above raw coding , we should write <!DOCTYPE html> at the beginning which tells the browser it is a html program.

We should ensure the the <title> element should be write within the <head> tag otherwise the code will be no work and page content should be write within the <body> tag.


That’s all. If this article is helpful please share it!!!!


Please Donate To Bitcoin Address: [[address]]
Donation of [[value]] BTC Received. Thank You.
[[error]]
Introduction of HTML tutorial for beginners


In this article we will learn what is HTML and basic structure of raw HTML.
HTML is Hyper Text Markup Language is used to create web page.
Introduction of HTML tutorial for beginners

Structure of Raw HTML

==================================================================
Now we are going to explain the structure of raw HTML coding.

<!DOCTYPE html>
<html>
    <head>
     (title and css defines here)
     </head>
     <body>
      (content area)  
     </body>
</html


From the above raw coding , we should write <!DOCTYPE html> at the beginning which tells the browser it is a html program.

All the element ,attribute ,metadata and content should be write within the <html> tag which start with <html tag and end with </html>

Inside the <html> tag two more tags are there one is <head> tag and other is <body> tag.

Title of the webpage and style sheet should be define inside the <head>  tag and all content should be define inside the body tag.


That’s all. If this article is helpful please share it!!!!


Please Donate To Bitcoin Address: [[address]]
Donation of [[value]] BTC Received. Thank You.
[[error]]

How to create a shell script using the conditional statement on CentOS and RHEL 6/7 step by step guide


How to create a shell script using the conditional statement on CentOS and RHEL 6/7  step by step guide


In this article we will learn how to create a shell script using the conditional statement  and execute it on CentOS and RHEL linux system and we are going to create a script with bash if  statement to demonstrate example.


Shell script is very powerful language for a system admin to execute the daily basic staff.


In this article we use if else statement to understand the example.
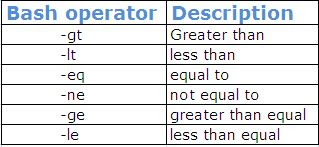
Following bash operators are useful to write a conditional shell script program.
bash operator in shell script for linux unix system| techrideradmin,bash if
bash operator in shell script for linux unix system| techrideradmin

How to create a shell script using if else statement on linux system

======================================================================
Now we are going to write one small shell script program to understand how conditional statement works in the shell script program on the linux system  .


First we create one empty file named condition .sh using the below command.

#touch condition.sh

After creating empty file we enter the below line to create bash if statement in the file. 

#!/bin/bash
echo How old are you?
read  age
if [ “$age” –gt 25 ] then
echo you can drive
else
echo you can not drive
fi

note: we shoule use #!/bin/bash to identify this script only run in bash shell not the other shell .

 How to execute the shell script program

======================================================================
To execute this program we need to execute the below command.

[root@localhost ~]# sh condition.sh

After execute the above command we can find the below output..


Output:
How old are you?
18
you can not drive
How to create a shell script using the conditional statement on CentOS and RHEL 6/7  step by step guide
How to create a shell script using the conditional statement on CentOS and RHEL 6/7  step by step guide

That’s all. If this article is helpful to know about bash if statement please share it!!!!


Please Donate To Bitcoin Address: [[address]]
Donation of [[value]] BTC Received. Thank You.
[[error]]
How to create and show table in mysql database using python on CentOS and RHEL 6/7 step by step guide


How to create and show table in  mysql database using python on CentOS and RHEL 6/7  step by step guide


In this article we will learn how to create mysql table in  database using python language.

We need to install the mysql.connector module using the below command.

#pip3 install mysql.connector

Normally we create mysql table into database using “create table” statement and select the database in which mysql table will be created.

How to create mysql table into databse using python

First we need to create one file named createtable.py and enter the below code into this file  .

import mysql.connector

mydb = mysql.connector.connect(
  host="localhost",
  user="root",
  passwd="abc123",
  database=” pythonclass”
)
cur = mydb.cursor()
cur.execute("CREATE TABLE student (name VARCHAR(30), location VARCHAR(100))")

How to execute the python progam

To execute the python program we need to execute the below command.
[root@localhost ~]# python3 createtable.py

After executing the above command new table has been created.

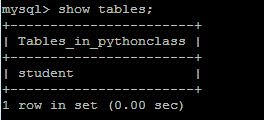
Now enter the mysql promt and verify it is created or not using “show tables” statement.


mysql> show tables;
+-----------------------+
| Tables_in_pythonclass |
+-----------------------+
| student               |
+-----------------------+
1 row in set (0.00 sec)
How to create and show table in  mysql database using python on CentOS and RHEL 6/7  step by step guide
How to create and show table in  mysql database using python on CentOS and RHEL 6/7  step by step guide

How to view mysql database table using python

We also can check created table list using python program.

We create one file name showtable.py and enter the below command.

import mysql.connector

mydb = mysql.connector.connect(
  host="localhost",
  user="root",
  passwd="abc123"
  database=”pythonclass”
)

cur = mydb.cursor()

cur.execute("SHOW TABLES")

for x in cur:
  print(x)


That’s all. If this article is helpful please share it!!!!


How to install pip3 on CentOS and RHEL 6/7 step by step guide


How to install pip3  on CentOS and RHEL 6/7  step by step guide

In this article we will learn how to install pip3 on CentOS and RHEL linux system which is very useful to install python packages for that reason it is called as python package manager.
How to install pip3  on CentOS and RHEL 6/7  step by step guide
How to install pip3  on CentOS and RHEL 6/7  step by step guide

How to install Pip on CentOS and RHEL  linux system

 Pip package is not available the redhat or centos repo. We need to install epel to install the pip package.To install pip on the linux system we need to execute the below commands.

#yum install epel-release
#yum install python-pip

After install this package we need to verify .

How to verify the version of pip

To verify the pip version which you have installed  execute the below commands.

#pip –V 
#pip3 –V

How to run pip to manage python packages

To manage python package ( install ,uninstall and search ) using pip we need to execute the below commands.

#pip install <package_name>
#pip uninstall <package_name>
#pip search <package_name>

That’s all. If this article is helpful please share it!!!!


Please Donate To Bitcoin Address: [[address]]

Donation of [[value]] BTC Received. Thank You.
[[error]]