How to delete partition in linux system step by step guide with practical examples


 Delete Partition in linux using fdisk | In this article we learn how to delete partition using fdisk .

It is very essential task for a system administrator to manage the user data. If you required additional hard drive to store  data we have to add the additional hdd and  create a new partition for it. If we don’t aware about the operation when we delete a partition there is a chance to lost the user data.

Verify the partition list before deletion a partition

When we are going to delete a  partition of our linux system to fulfill our requirement first of all  we have to view the partition table before do this. To view the partition table we execute the below command.
#fdisk -l
   Device Boot      Start         End      Blocks   Id  System
/dev/sda1   *           1          64      512000   83  Linux
Partition 1 does not end on cylinder boundary.
/dev/sda2              64        1045     7875584   8e  Linux LVM

Disk /dev/sdb: 8589 MB, 8589934592 bytes
255 heads, 63 sectors/track, 1044 cylinders
Units = cylinders of 16065 * 512 = 8225280 bytes
Sector size (logical/physical): 512 bytes / 512 bytes
I/O size (minimum/optimal): 512 bytes / 512 bytes
Disk identifier: 0x48bf2abc

   Device Boot      Start         End      Blocks   Id  System
/dev/sdb1               1           8       64228+  83  Linux

Fdisk Delete partition 


Then  we unmount the  partion which we are voing to delete using “umount”command. Then remove  the entry from /etc/fstab file  to permanent unmount the partition.

[root@localhost ~]# df -h
Filesystem            Size  Used Avail Use% Mounted on
/dev/mapper/VolGroup-lv_root
                      6.5G  4.6G  1.6G  75% /
tmpfs                 244M     0  244M   0% /dev/shm
/dev/sda1             477M   72M  376M  17% /boot
/dev/sdb1              57M  1.3M   52M   3% /test

[root@localhost ~]# umount /test

[root@localhost ~]# df -h
Filesystem            Size  Used Avail Use% Mounted on
/dev/mapper/VolGroup-lv_root
                      6.5G  4.6G  1.6G  75% /
tmpfs                 244M     0  244M   0% /dev/shm
/dev/sda1             477M   72M  376M  17% /boot

Now we are going to delete the /dev/sdb1 partition .to do this activity we execute the below task.

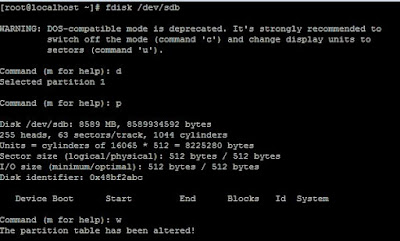
[root@localhost ~]# fdisk /dev/sdb

WARNING: DOS-compatible mode is deprecated. It's strongly recommended to
         switch off the mode (command 'c') and change display units to
         sectors (command 'u').

Command (m for help): d
Selected partition 1

Command (m for help): p

Disk /dev/sdb: 8589 MB, 8589934592 bytes
255 heads, 63 sectors/track, 1044 cylinders
Units = cylinders of 16065 * 512 = 8225280 bytes
Sector size (logical/physical): 512 bytes / 512 bytes
I/O size (minimum/optimal): 512 bytes / 512 bytes
Disk identifier: 0x48bf2abc

   Device Boot      Start         End      Blocks   Id  System

Command (m for help): w
The partition table has been altered!

Calling ioctl() to re-read partition table.

WARNING: Re-reading the partition table failed with error 16: Device or resource busy.
The kernel still uses the old table. The new table will be used at
the next reboot or after you run partprobe(8) or kpartx(8)
Syncing disks.
How to delete partition in linux system step by step guide with practical examples,Fdisk Delete partition
How to delete partition in linux system step by step guide with practical examples


First we press “d” key to deleted the partition and then press “p” key to view the partition table and to save it press”w” key.
Now to update the partition table online  we have to execute “partprobe” command.

If this article is helpful to know about Delete Partition in linux using fdisk please share and subscribe this article.

How to create new partition in linux system step by step guide with practical examples


How to create new partition in linux system step by step guide with practical examples

In this article we learn how to create a new partition as per your requirement and how to update the created partition of the linux system.

It is very essential task for a system administrator to manage the user data. If you required additional hard drive to store  data we have to add the additional hdd and  create a new partition for it. If we don’t aware about the operation when we delete a partition there is a chance to lost the user data.

Verify the partition list before creation a new partition

When we are going to create a new partition as per our requirement we have to view the partition table before do this. To view the partition table we execute the below command.

#fdisk –l
Disk /dev/sda: 8589 MB, 8589934592 bytes
255 heads, 63 sectors/track, 1044 cylinders
Units = cylinders of 16065 * 512 = 8225280 bytes
Sector size (logical/physical): 512 bytes / 512 bytes
I/O size (minimum/optimal): 512 bytes / 512 bytes
Disk identifier: 0x000ef612

   Device Boot      Start         End      Blocks   Id  System
/dev/sda1   *           1          64      512000   83  Linux
Partition 1 does not end on cylinder boundary.
/dev/sda2              64        1045     7875584   8e  Linux LVM

Disk /dev/sdb: 8589 MB, 8589934592 bytes
255 heads, 63 sectors/track, 1044 cylinders
Units = cylinders of 16065 * 512 = 8225280 bytes
Sector size (logical/physical): 512 bytes / 512 bytes
I/O size (minimum/optimal): 512 bytes / 512 bytes
Disk identifier: 0x00000000

Here we have two partitions which are /dev/sda1 and /dev/sda2.we add new  hdd  and that is /dev/sdb and we create a new partition on this disk.


Create a new partition


we add new  hdd  and that is /dev/sdb and we create a new partition on this disk.
To create a new partition we execute the below command .

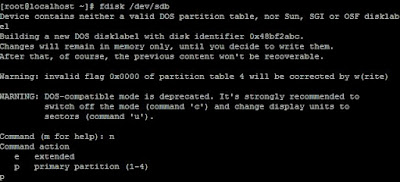
[root@localhost ~]# fdisk /dev/sdb
Device contains neither a valid DOS partition table, nor Sun, SGI or OSF disklabel
Building a new DOS disklabel with disk identifier 0x48bf2abc.
Changes will remain in memory only, until you decide to write them.
After that, of course, the previous content won't be recoverable.

Warning: invalid flag 0x0000 of partition table 4 will be corrected by w(rite)

WARNING: DOS-compatible mode is deprecated. It's strongly recommended to
         switch off the mode (command 'c') and change display units to
         sectors (command 'u').

Command (m for help): n
Command action
   e   extended
   p   primary partition (1-4)
p
Partition number (1-4): 1
First cylinder (1-1044, default 1):
Using default value 1
Last cylinder, +cylinders or +size{K,M,G} (1-1044, default 1044): 57M

Command (m for help): P

Disk /dev/sdb: 8589 MB, 8589934592 bytes
255 heads, 63 sectors/track, 1044 cylinders
Units = cylinders of 16065 * 512 = 8225280 bytes
Sector size (logical/physical): 512 bytes / 512 bytes
I/O size (minimum/optimal): 512 bytes / 512 bytes
Disk identifier: 0x48bf2abc

   Device Boot      Start         End      Blocks   Id  System
/dev/sdb1               1           8       64228+  83  Linux

Command (m for help): W
The partition table has been altered!

Calling ioctl() to re-read partition table.
Syncing disks.

How to create new partition in linux system step by step guide with practical examples


First we need to  press “n” key to create new partition. After that we define the partition size, then press “p” key to print the table and finally we press ”w” key to save the table.

To update partition table after creating a new partition


After creating a new partition we need to update the partition table to update the partition table without reboot the system we use “partprobe” command.

After that we format the new partition and mount the the partition to access the partition to store data.

[root@localhost ~]# mkfs.ext4 /dev/sdb1
mke2fs 1.43-WIP (20-Jun-2013)
Filesystem label=
OS type: Linux
Block size=1024 (log=0)
Fragment size=1024 (log=0)
Stride=0 blocks, Stripe width=0 blocks
16064 inodes, 64228 blocks
3211 blocks (5.00%) reserved for the super user
First data block=1
Maximum filesystem blocks=65798144
8 block groups
8192 blocks per group, 8192 fragments per group
2008 inodes per group
Superblock backups stored on blocks:
        8193, 24577, 40961, 57345

Allocating group tables: done
Writing inode tables: done
Creating journal (4096 blocks): done
Writing superblocks and filesystem accounting information: done

Now we create test directory to mount /dev/sdb1 partition. To do this we executes below commands.

[root@localhost ~]# mkdir /test
 [root@localhost ~]# mount /dev/sdb1 /test
[root@localhost ~]# df -h
Filesystem            Size  Used Avail Use% Mounted on
/dev/mapper/VolGroup-lv_root
                      6.5G  3.2G  3.0G  52% /
tmpfs                 244M     0  244M   0% /dev/shm
/dev/sda1             477M   72M  376M  17% /boot
/dev/sdb1              57M  1.3M   52M   3% /test

To mount permanently we need to entry in /etc/fstab .


Describe /etc/passwd file in linux system with practical examples


Describe /etc/passwd file in linux system with practical examples

In this article we learn about “/etc/passwd” file in linux system that is brief description all filed of the “/etc/passwd” file, which field stores which information. It is very important file for a system administrator to manage the user account.

Passwd file is stored the /etc directory in the linux system. to view the “/etc/passwd” file we execute the below command.

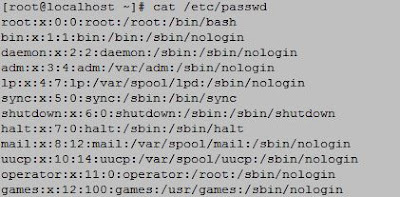
 [root@localhost ~]# cat /etc/passwd
root:x:0:0:root:/root:/bin/bash
bin:x:1:1:bin:/bin:/sbin/nologin
daemon:x:2:2:daemon:/sbin:/sbin/nologin
adm:x:3:4:adm:/var/adm:/sbin/nologin
lp:x:4:7:lp:/var/spool/lpd:/sbin/nologin
sync:x:5:0:sync:/sbin:/bin/sync
shutdown:x:6:0:shutdown:/sbin:/sbin/shutdown
halt:x:7:0:halt:/sbin:/sbin/halt
mail:x:8:12:mail:/var/spool/mail:/sbin/nologin
uucp:x:10:14:uucp:/var/spool/uucp:/sbin/nologin
operator:x:11:0:operator:/root:/sbin/nologin
games:x:12:100:games:/usr/games:/sbin/nologin

Describe /etc/passwd file in linux system with practical examples


Explain first field of the /etc/passwd file

From the above output we saw that first filed is the username field. When we create a user the username sets in this field. When we login terminal using the username then this value compares the value which is stored in username field which is created during creation of a user.

Explain second field of the /etc/passwd file

From the above output we saw the second field is encrypted password field of the user account. Normally the encrypted password uses the DES algorithm to secure the password of an user. To do more secure of the password of an user linux is store the user password in the other file which is called /etc/shadow.

Explain third field of the /etc/passwd file

Third field indicate the user id of an specific user. This id will be unique.user id “0” indicates the root user. system is reserved userid from 0 to 500 . when we create new user it is created with user id after 500.


Explain fourth field of the /etc/passwd file

Fourth field indicated the group id of the user. When we create an user primary group is automatically created for the user if we don’t specify the primary group of the user.this field indicates the primary group id of the user.

Explain fifth field of the /etc/passwd file

Fifth field indicated the description field of the user user. In an organization when we create some users we need to mention their details to maintain the user record. This field stores these records.

Explain sixth field of the /etc/passwd file

Sixth field indicated the home directory of the user. When we create an user home directory is automatically created for the user if we don’t specify the custom home directory. This home directory is stored in this field.

Explain seventh field of the /etc/passwd file

Seventh field indicates the shell of he user. When we create an user “/bin/bash” shell is automatically created for the user. This shell is stored in this field.


Explained User management in linux with practical examples


Please Donate To Bitcoin Address: [[address]]
Donation of [[value]] BTC Received. Thank You.
[[error]]

Describe usermod operation in linux with practical examples


Describe usermod operation in linux with practical examples

In this article we learn how to change user group , how to lock and unlock user account, how to change user shell , how to change user home directory and how to change the description of the user if need to change the comment.

After creating user if any modification is needed then we use “usermod” command.

How to change user group

When user is added then default primary group is created if there is any requirement to change we can change the primary group using usermod command and use ‘-g” switch to execute this change.

Lets take an example when we create test user by default “test” primary group is created . if we need to change the primary group  to “primary” we execute the below command.

#usermod –g primary test

Describe usermod operation in linux with practical examples


If we need to change the secondary group we use “-G “ switch to do this job.

#usermod –G  secondary test

How to lock user account

Some time we need to lock user account for the security reason. To lock an user account we use “-L” switch .

#usermod –L test

How to unlock locked user account

To unlock a locked user account we “-U” switch.After executing thee below command we unlock the locked account.

#usermod –U test

How to change the default user shell

To change the default user shell we can use “usermod “ command along with “-s” switch. By default when user is created “/bin/bash” shell is created automatically. If we want to change it to nologin shell we execute the below command.

#usermod –s nologin test

How to change home directory of user

When user is created a home directory is automatically created for that user. To change the default home directory we use “-d” switch.

#usemod –d <path name>

How to change user description

In an organization when a user retired or transferred we need to change the description of the user .To do this we use “-c” switch.
#usermod –c “updated comment” test


Please Donate To Bitcoin Address: [[address]]
Donation of [[value]] BTC Received. Thank You.
[[error]]

Explained User management in linux with practical examples


Explained User management in linux with practical examples

In this article we learn user management in linux that include how to create new user, how to set password for the new user, how to create custom home directory, how to create user without home directory, how to describe about the user, how to create custom shell for the new user, how to create custom primary group for the new user and how to set secondary group for the created new user.

Maintain user management is the most important task for an system administrator.

How to create new user in linux system 

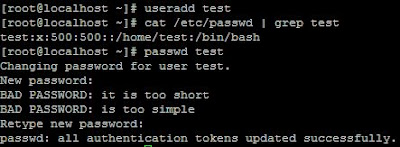
To create a new user account we need to execute ”useradd” command to the shell. After executing this command new use account will be created with its own home directory, its own shell and automatically create its own primary group.To add the new user we execute the below command.

#useradd test <here test is the username>

After execute the above command user is created  but account will be locked. To unlock the user account we need to execute the “passwd” command. After execute the below command the use account will be unlock.


Explained User management in linux with practical examples

How to create custom home directory for new user in linux system 

When we are going to create new user its home directory is automatically created. To create the custom directory we use “-d” switch. First we need to create the the specified location in which user home directory is created   and then we use “-d” switch to create custom directory.

Suppose our specified location is “/testuser/test” .we first create “/testuser/test” directory and to set it we use the below command.

#useradd –d /testuser/test test

How to create user without home directory

To create a user without home directory we use “-M” switch. We need to execute the below command.

#useradd –M test

How to describe about the new user

When we create to a new user for an organization we need to mention the description for the new user. To do this we use “-c” switch.

#useradd –c “user description” test

How to create custom shell for the new user

When we create a new user “/bin/bash” shell is automatically created. To create the custom shell we use “-s” switch to execute it.

#useradd –s /bin/ksh

How to create custom primary group

When a user is create its primary group is automatically created. To  change it forcefully to a custom group we use “-g” switch.

#groupadd primary
#useradd –g primary test

How to add a user to a secondary group 

To belong the test user in the secondary group we use “–G” switch.

#groupadd secondary


Please Donate To Bitcoin Address: [[address]]
Donation of [[value]] BTC Received. Thank You.
[[error]]

HOW TO CONFIGURE EIGRP ON CISCO ROUTER USING PACKET TRACER SOFTWARE STEP BY STEP GUIDE


HOW TO CONFIGURE EIGRP ON CISCO ROUTER USING PACKET TRACER SOFTWARE

In this article we learn how to configure EIGRP and how to verify EIGRP after configuration on cisco router using packet tracer software.

What is EIGRP

EIGRP is called  advanced distance vector and it is  classless protocol. It is a standard protocol and use for cisco and non cisco device, but initially it was cisco proprietary.  It is included all features of igrp. It supports upto 255 hop count and by default it supports upto 100 hop count.

Administrative distance of EIGRP is 90.It does not uses broadcast address .It only uses multicast and unicast address.

By default EIGRP uses bandwidth and delay to calculate the metric calculation.

Lab diagram

HOW TO CONFIGURE EIGRP ON CISCO ROUTER USING PACKET TRACER SOFTWARE

               HOW TO CONFIGURE EIGRP ON CISCO ROUTER USING PACKET TRACER SOFTWARE


In the above diagram we learn the configuration of EIGRP on cisco router using packet tracer software.

Configuration of EIGRP on cisco router using packet tracer

We have to follow two commands to configure EIGRP on cisco router. To enabling the EIGRP we use “router eigrp <AS NO>” (AS is the autonomous system no which should be same ,if as no is different routers can not build eigrp neighbour relationship). Secondly router has to advertise their network to configure the EIGRP.

For router0
#router eigrp 1
#network 10.0.0.0
#network 172.16.0.0


For router1

#router eigrp 1
#network 172.16.0.0
#network 192.168.1.0

verify of EIGRP on cisco router using packet tracer

After configuration we need to verify the configuration whether it is configured successfully or not. To verify the the neighbour table on the router0 we execute the below command.

Router#show ip eigrp neighbors
IP-EIGRP neighbors for process 1
H Address Interface Hold Uptime SRTT RTO Q Seq
(sec) (ms) Cnt Num
0 172.16.0.2 Se0/0/0 13 00:00:42 40 1000 0 4

To verify the topology table from the router0 we execute the below command.

Router#sh ip eigrp topology
IP-EIGRP Topology Table for AS 1/ID(172.16.0.1)

Codes: P - Passive, A - Active, U - Update, Q - Query, R - Reply,
r - Reply status

P 10.0.0.0/8, 1 successors, FD is 5120
via Connected, GigabitEthernet0/0
P 172.16.0.0/16, 1 successors, FD is 2169856
via Connected, Serial0/0/0
P 192.168.1.0/24, 1 successors, FD is 2172416
via 172.16.0.2 (2172416/5120), Serial0/0/0

To verify the routing table from router0 we execute the below command

Router#sh ip route
Codes: L - local, C - connected, S - static, R - RIP, M - mobile, B - BGP
D - EIGRP, EX - EIGRP external, O - OSPF, IA - OSPF inter area
N1 - OSPF NSSA external type 1, N2 - OSPF NSSA external type 2
E1 - OSPF external type 1, E2 - OSPF external type 2, E - EGP
i - IS-IS, L1 - IS-IS level-1, L2 - IS-IS level-2, ia - IS-IS inter area
* - candidate default, U - per-user static route, o - ODR
P - periodic downloaded static route

Gateway of last resort is not set

10.0.0.0/8 is variably subnetted, 2 subnets, 2 masks
C 10.0.0.0/8 is directly connected, GigabitEthernet0/0
L 10.0.0.1/32 is directly connected, GigabitEthernet0/0
172.16.0.0/16 is variably subnetted, 2 subnets, 2 masks
C 172.16.0.0/16 is directly connected, Serial0/0/0
L 172.16.0.1/32 is directly connected, Serial0/0/0
D 192.168.1.0/24 [90/2172416] via 172.16.0.2, 00:04:12, Serial0/0/0

Thanks for learning this article. If you like this article please like ,share and comment for this article.   

Please Donate To Bitcoin Address: [[address]]

Donation of [[value]] BTC Received. Thank You.
[[error]]