Showing posts with label APACHE. Show all posts

How to install and configure mod_pagespeed Apache module on CentOS 7 server step by step guide


Install and configure mod_pagespeed on linux |In this article we learn what is mod_pagespeed and how to install and configure mod_pagespeed on centos ,rhel linux  server.

What is mod_pagespeed?

Mod_pagespeed is an apache module which is used to boost up php script by eliminating compilation time of php scripts by caching compiled code into its memory and at the run time compiled code loads the php script directly from the memory to enhance the speed of the php application.

Installation of mod_pagespeed on centos server

Before installation of mod_pagespeed we need to install at package.To install at package we need to execute the below command.

#yum install at

After installing ata package we are going to install mod_pagespeed apache module using the below command.

--2019-01-07 20:56:56--  https://dl-ssl.google.com/dl/linux/direct/mod-pagespeed-stable_current_x86_64.rpm
Resolving dl-ssl.google.com (dl-ssl.google.com)... 74.125.24.190, 74.125.24.93, 74.125.24.136, ...
Connecting to dl-ssl.google.com (dl-ssl.google.com)|74.125.24.190|:443... connected.
HTTP request sent, awaiting response... 200 OK
Length: 7607004 (7.3M) [application/x-redhat-package-manager]
Saving to: ‘mod-pagespeed-stable_current_x86_64.rpm’

100%[======================================>] 7,607,004    265KB/s   in 33s

2019-01-07 20:57:30 (226 KB/s) - ‘mod-pagespeed-stable_current_x86_64.rpm’ saved [7607004/7607004]

[root@localhost ~]# rpm -ivh mod-pagespeed-stable_current_x86_64.rpm
warning: mod-pagespeed-stable_current_x86_64.rpm: Header V4 DSA/SHA1 Signature, key ID 7fac5991: NOKEY
Preparing...                          ################################# [100%]
Updating / installing...
   1:mod-pagespeed-stable-1.13.35.2-0 ################################# [100%]
Redirecting to /bin/systemctl start atd.service
job 1 at Mon Jan  7 21:01:00 2019

Configuration file and module location of mod_pagespeed

main configuration file  located at “/etc/httpd/conf.d/pagespeed.conf”.
How to install and configure mod_pagespeed Apache module on CentOS 7 server step by step guide


module is located at “/usr/lib/httpd/modules/mod_pagespeed.so”.

Configure mod_pagespeed on centos server

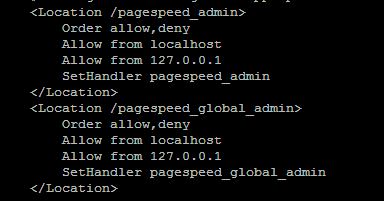
By default mod_pagespeed module is enabled . config screenshot as below.
<IfModule pagespeed_module>
    # Turn on mod_pagespeed. To completely disable mod_pagespeed, you
    # can set this to "off".
    ModPagespeed on
 To disable it we need to change the  ModPagespeed parameter from on to off.
    ModPagespeed off


We can select different level of setting from the config file. The default level is corefilters.

We can enable and disable filter using the ModPagespeedEnableFilters and ModPagespeedDisable 
Filters directives.

Thats all.If this article is helpful to install and configure mod_pagespeed module please share it!


How to configure Basic Authentication with Apache using .htaccess on CentOS 7 server step by step guide


Authentication apache using .htaccess on linux |In this article we learn how to configure basic authentication with apache using .htaccess on centos server.

Apache is most popular web server all over the world. To enhance the security of apache by configuring  website with password authentication which is prevent malicious users from accessing the website.

Allow .htaccess authentication on apache

By default .htaccess is not enable on apache configuration file. We need to configure it .To configure it we need to go http default configuration file and search “<Directory "/var/www/html">section and under this section we need to change the From AllowOverride none to AllowOverride AuthConfig.

Create password file using htpasswd on apache

We need to create a hidden htpasswd file which is used to store the credential of user which is necessary to login the website. We are creating this hidden file under “/etc/httpd” directory.

To create the .htpasswd file we need to execute the below command.

#htpasswd -c /etc/httpd/.htpasswd testuser

After that put the password and confirm it ,it will stored into the hidden file.
The content of this file as below.

[root@localhost ~]# cat /etc/httpd/.htpasswd
testuser:$apr1$GQ7aRO.O$NCFWjQEqLUkUfQN7JwdGP1

Now we need to change the permission and ownership of the hidden file to read it by apache user.To do this we execute the below command.

#chown apache:apache /etc/httpd/.htpasswd
#chmod 660 /etc/httpd/.htpasswd

Now we create .htaccess file inside the web directory which is “/var/www/html” and add these below lines inside the files to configure password authentication on apache.

AuthType Basic
AuthName "Restricted Content"
AuthUserFile /etc/httpd/.htpasswd
Require valid-user

After that we need to restart the apache service using the below command.

#systemctl restart httpd

After that when we are using the web url through browser we will get the authentication promt as below.
How to configure Basic Authentication with Apache using .htaccess on CentOS 7 server step by step guide

That's all.If this article is helpful to know about Authentication apache using .htaccess on linux  please share it!!!


How to install and simple setup LAMP stack on CentOS 7 step by step guide


In this article we learn what is LAMP stack and how to install and setup LAMP stack  on centos 7.

What is LAMP stack

LAMP stack is used to host web site as well as web application on server.LAMP stand for Linux,Apache(to host the web site),Mysql (to store the data used as a database server),Php (for php application).

Install Apache web server on centos 7

To install apache server execute the below command.
[root@localhost ~]# yum install httpd

After installing the APACHE server we need to turn on(enable the APACHE service at the startup mode) httpd service to turn on the service we execute the below command.
For linux(5/6)
#chkconfig httpd on
For linux 7
#systemctl enable httpd

 To start,stop and restart the APACHE service we need to execute the below command.
For linux(5/6)
#service httpd start
#service httpd stop
#service httpd restart

For linux 7
#systemctl start httpd
#systemctl stop httpd
#systemctl restart httpd
How to install and simple setup  LAMP stack on CentOS 7  step by step guide

How to install and simple setup  LAMP stack on CentOS 7  step by step guide


Install Mariadb server on centos 7

To install MariaDB on CentOS 7 we need to execute the below command.
#yum install mariadb-server mariadb

To start and enable the MariaDB service on CentOS 7 we need to execute the below command.
#systemctl start mariadb
#systemctl enable mariadb

CentOS 7  uses firewalld as a software firewall instead of iptables. By default MariaDB server is running on 3306 port. We need to allow this port into firewall rule to access it. To allow the incoming connection to the standard MySQL tcp port we need to execute the below command.
#firewall-cmd  - -permanent  - -add-service=mysql
#firewall-cmd  -- reload

To secure MariaDB we use “mysql_secure_installation” .After executing the “mysql_secure_installation” command we need to set root password,remove test database, remove anonymous user login and disable the remote login.

#mysql_secure_installation

NOTE: RUNNING ALL PARTS OF THIS SCRIPT IS RECOMMENDED FOR ALL MariaDB
      SERVERS IN PRODUCTION USE!  PLEASE READ EACH STEP CAREFULLY!

In order to log into MariaDB to secure it, we'll need the current
password for the root user.  If you've just installed MariaDB, and
you haven't set the root password yet, the password will be blank,
so you should just press enter here.

Enter current password for root (enter for none):
OK, successfully used password, moving on...

Setting the root password ensures that nobody can log into the MariaDB
root user without the proper authorisation.

Set root password? [Y/n] y
New password:
Re-enter new password:
Password updated successfully!
Reloading privilege tables..
 ... Success!


By default, a MariaDB installation has an anonymous user, allowing anyone
to log into MariaDB without having to have a user account created for
them.  This is intended only for testing, and to make the installation
go a bit smoother.  You should remove them before moving into a
production environment.

Remove anonymous users? [Y/n] y
 ... Success!

Normally, root should only be allowed to connect from 'localhost'.  This
ensures that someone cannot guess at the root password from the network.

Disallow root login remotely? [Y/n] y
 ... Success!

By default, MariaDB comes with a database named 'test' that anyone can
access.  This is also intended only for testing, and should be removed
before moving into a production environment.

Remove test database and access to it? [Y/n] y
 - Dropping test database...
 ... Success!
 - Removing privileges on test database...
 ... Success!

Reloading the privilege tables will ensure that all changes made so far
will take effect immediately.

Reload privilege tables now? [Y/n] y
 ... Success!

Cleaning up...

All done!  If you've completed all of the above steps, your MariaDB
installation should now be secure.

Thanks for using MariaDB!

After that restart the service using the below command.

#systemctl restart mariadb


Install PHP on centos 7

To install php on centos server we need to execute the below command.
yum install php php-mysql php-gd
after executing this above command we need to restart the httpd service using the below command.
#systemctl restart httpd

That’s all. We have configured the LAMP stack. If this article is helpful please share it!!!!!


Simple step by step guide to redirect HTTP TO HTTPS in APACHE on RHEL/Centos/Oracle linux (5-6-7)


In this article we learn how to redirect HTTP to HTTPS in APACHE on linux. Https is used to transfer data over internet securely. To enhance the security we need to force redirection from http to https.

To do this redirection first we need to configure SSL Certificate in the linux sytem and we need to enable one module mod_rewrite. If this module is not enable in linux system we need to edit apache configuration file and enable the mod_rewrite module.

Method to redirect HTTP TO HTTPS in APACHE  on RHEL/Centos/Oracle linux (5-6-7)

We have two method to redirect HTTP to HTTPS in APACHE on linux system.

METHOD1: we edit the APACHE configuration file and add the below line.suppose our domain name is www.example.org

Redirect permanent / https://www.example.org/

METHOD2: We edit the APACHE configuration file and also add the below lines under the Document Root section

  RewriteEngine On
  RewriteCond %{HTTPS} off
  RewriteRule (.*) https://%{HTTP_HOST}%{REQUEST_URI} [R,L]

Simple step by step guide to redirect HTTP TO HTTPS in APACHE  on RHEL/Centos/Oracle linux (5-6-7)

Simple step by step guide to redirect HTTP TO HTTPS in APACHE  on RHEL/Centos/Oracle linux (5-6-7)


Recommended Read: https://techrideradmin.blogspot.com/2018/12/simple-step-by-step-guide-to-configure-SSL-for-APACHE-webserver-in-linux-RHEL-Centos-Oracle-5-6-7.html

Now restart the APACHE webserver using the below command
For linux(5/6)
#service httpd restart
For linux7
#systemctl restart httpd

Now open the browser and type http://server ipaddress  and it will be redirect to https.

That’s all if this article is helpful to know about redirect http to https please share this  article!!!!!!!

How to configure APACHE as a reverse proxy on RHEL/Centos/Oracle linux(5/6/7) step by step guide


How to configure APACHE  as a reverse proxy on RHEL/Centos/Oracle  linux(5/6/7) step by step guide

In this article we learn how to configure APCHE as a reverse proxy in linux. Reverse proxy takes http and https request from the user end and transfer this request to the backend server.

Advantage of APACHE reverse proxy server

·         APACHE reverse proxy server hide the original server from the outside world. Thus these backend servers are secured.
·         APACHE reverse proxy also used to encrypt and decrypt the webserver traffic.
·         APACHE reverse proxy acts as a loadbalancer.

LAB Environment to configure APACHE reverse proxy

To demonstrate APACHE reverse proxy we use same server as a backend server as well as  APACHE reverse proxy server.
Backend server IP ADDRESS=================è  192.168.137.3
Backend server port no====================è 80
APACHE reverse proxy server IP ADDRESS=====è 192.168.137.5
APACHE proxy server port no==============è 80

When user hits the (192.168.137.5) address user will get the content of the backend server.

Pre-requisites to configure APACHE reverse proxy

To configure APACHE reverse proxy we need to install apache pacakages on the linux server. To install the apache package on the linux server find the below reference link.


Modules required to configure APACHE as a reverse proxy

To configure APACHE  as a reverse proxy we need to enable two modules .

Mod_proxy: This module is main to configure APACHE as a reverse proxy. It takes the responsibility to redirect the connection.

Mod_proxy_http: This module handles the http and https request.
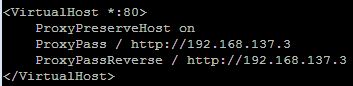
If these two modules is not enabled we need to go and edit  “/etc/httpd/conf/httpd.conf” file and  uncomment the below lines to enable these two modules.

<VirtualHost *:80>
    ProxyPreserveHost on
    ProxyPass / http://192.168.137.3
    ProxyPassReverse / http://192.168.137.3
</VirtualHost>

How to configure APACHE  as a reverse proxy on RHEL/Centos/Oracle  linux(5/6/7) step by step guide

How to configure APACHE  as a reverse proxy on RHEL/Centos/Oracle  linux(5/6/7) step by step guide


After doing the above activity we start the APACHE webserver using the below command.
For linux(5/6)
#service httpd start
For linux7
#systemctl start httpd

 Thats all if this article is helpful please share it!!


Simple step by step guide to Configure SSL for APACHE webserver in RHEL/Centos/Oracle linux(5/6/7)


Simple step by step guide to Configure SSL for APACHE webserver in RHEL/Centos/Oracle linux(5/6/7)

In this article we learn how to configure SSL certificate for APACHE webserver in linux. SSL stands for secure socket layer which is used to transfer data over internet securely. Thus confidential data are transferred over internet in encrypted format for that hacker are not able to view the data and your confidential data kept secure.

Pre-requisite of configure SSL certificate for APACHE  webserver

To configure SSL certificate for APACHE webserver we need to install APACHE webserver package. To install the APACHE webserver packages please follow the below link.


After the we need to configure Virtual hosts. To do this follow the below steps.
Lets take an example we have a websites example1.com which will be hosted on a ip address which is 192.168.137.3.

To configure this we need to go to the configuration file of the APACHE webserver and create the VIrtualHosts.

<VirtualHost 192.168.137.3:80>
    ServerAdmin webmaster@example1.com
    DocumentRoot /var/www/html/example1.com
    ServerName example1.com
    ErrorLog logs/example1.com
    CustomLog logs/example1.com common
</VirtualHost>

Now we have to create the Document Root for this website. To create the Document Root we need to go “/var/www/html” directory and create one directory which is “example1.com” and then create index.html file inside the directory.

[root@localhost ~]# cd /var/www/html
[root@localhost html]# pwd
/var/www/html
[root@localhost html]# mkdir example1.com
 [root@localhost html]# cd example1.com/
[root@localhost example1.com]# echo "welcome to example1" > index.html

If we don’t have DNS server we entry the hostname of the server in”/etc/hosts” file.
After doing the above activity we start the APACHE webserver using the below command.
For linux(5/6)
#service httpd start
For linux7
#systemctl start httpd

To verify the service we execute curl command .
[root@localhost ~]# curl http://example1.com
welcome to example1

Steps to Configure SSL for APACHE webserver in linux(5/6/7)

Step1: to configure SSL certificate for APACHE server we need to install two packages one is openssl  and other is mod_ssl.

To install these two packages we need to execute the below command.

[root@localhost ~]# yum install openssl mod_ssl
Loaded plugins: ulninfo
Setting up Install Process
……
Resolving Dependencies
--> Running transaction check
---> Package mod_ssl.x86_64 1:2.2.15-69.0.1.el6 will be installed
---> Package openssl.x86_64 0:1.0.1e-48.el6 will be updated
---> Package openssl.x86_64 0:1.0.1e-57.0.6.el6 will be an update
--> Finished Dependency Resolution

Dependencies Resolved

================================================================================
 Package      Arch        Version                  Repository              Size
================================================================================
…….
Transaction Summary
==============================================================================
Install       1 Package(s)
Upgrade       1 Package(s)

Total download size: 1.6 M
Is this ok [y/N]: y
Downloading Packages:
(1/2): mod_ssl-2.2.15-69.0.1.el6.x86_64.rpm            |  98 kB     00:01
(2/2): openssl-1.0.1e-57.0.6.el6.x86_64.rpm            | 1.5 MB     00:22
------------------------------------------------------------------------------
Total                                          64 kB/s | 1.6 MB     00:25
Running rpm_check_debug
Running Transaction Test
Transaction Test Succeeded
Running Transaction
  Updating   : openssl-1.0.1e-57.0.6.el6.x86_64                           1/3
  Installing : 1:mod_ssl-2.2.15-69.0.1.el6.x86_64                         2/3
  Cleanup    : openssl-1.0.1e-48.el6.x86_64                               3/3
  Verifying  : openssl-1.0.1e-57.0.6.el6.x86_64                           1/3
  Verifying  : 1:mod_ssl-2.2.15-69.0.1.el6.x86_64                         2/3
  Verifying  : openssl-1.0.1e-48.el6.x86_64                               3/3

Installed:
  mod_ssl.x86_64 1:2.2.15-69.0.1.el6

Updated:
  openssl.x86_64 0:1.0.1e-57.0.6.el6

Complete!


Step2: Generate private key using the below command.

[root@localhost ~]# openssl genrsa -out example.key 2048
Generating RSA private key, 2048 bit long modulus
...............................................................................................................+++
................+++
e is 65537 (0x10001)

Step3:Generate CSR using the below command.

[root@localhost ~]# openssl  req -new -key example.key -out example.csr
You are about to be asked to enter information that will be incorporated
into your certificate request.
What you are about to enter is what is called a Distinguished Name or a DN.
There are quite a few fields but you can leave some blank
For some fields there will be a default value,
If you enter '.', the field will be left blank.
-----
Country Name (2 letter code) [XX]:county name
State or Province Name (full name) []:state name
Locality Name (eg, city) [Default City]:city name
Organization Name (eg, company) [Default Company Ltd]:company name
Organizational Unit Name (eg, section) []:section name
Common Name (eg, your name or your server's hostname) []:hostname
Email Address []:

Please enter the following 'extra' attributes
to be sent with your certificate request
A challenge password []:
An optional company name []:

Step4:Generate self-signed certificate  using the below command.

[root@localhost ~]# openssl x509 -req -days 365 -in example.csr -signkey example.key -out example.crt
Signature ok
Getting Private key

Step5:copy key,csr and crt to the following location .

[root@localhost ~]# cp example.crt /etc/pki/tls/certs/
[root@localhost ~]# cp example.key /etc/pki/tls/private/
[root@localhost ~]# cp example.csr /etc/pki/tls/private/

Step6: configure SSL with ssl.conf file
Edit the” /etc/httpd/conf.d/ssl.conf” file and find SSLCertificateFile and  SSLCertificateKeyFile  and set the exact location .

SSLCertificateFile /etc/pki/tls/certs/example.crt
SSLCertificateKeyFile /etc/pki/tls/private/example.key

Step7: configure SSL with virtualhosts
Replace 80 port with 443 and add the below lines between < VirtualHost></ VirtualHost>.

SSLEngine on
SSLCertificateFile /etc/pki/tls/certs/example.crt
SSLCertificateKeyFile /etc/pki/tls/private/example.key

Now restart the APACHE webserver using the below command
For linux(5/6)
#service httpd restart
For linux7
#systemctl restart httpd

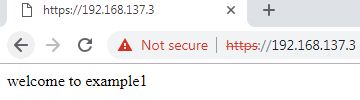
Now open the browser and type https://server ipaddress  and we will find the below output.


Simple step by step guide to Configure SSL for APACHE webserver in linux(5/6/7)

              Simple step by step guide to Configure SSL for APACHE webserver in linux(5/6/7)


Please Donate To Bitcoin Address: [[address]]
Donation of [[value]] BTC Received. Thank You.
[[error]]