How to install crontab in linux system step by step guide


How to install crontab in linux system step by step guide

In this article we learn how to install crontab in linux system, how to verify crontab package is successfully installed or not, how to start cron service and how to start cron service after booting the system automatically.

We also learn how to edit the crontab and after edit thr crontab how to listing these cron entries.

By default cron package is installed but some case it is not installed . to install it we need to follow the below procedure.

How to check crontab installed or not in the linux system

To check it we need to execute the below command.
#crontab -l 

If crontab is not install we get the following output of the above command.
[root@localhost ~]# crontab -l
-bash: /usr/bin/crontab: No such file or directory

How to install the crontab package

To install the crontab package we need to install cronie package.to install the cronie package we execute the below command.

#yum install cronie
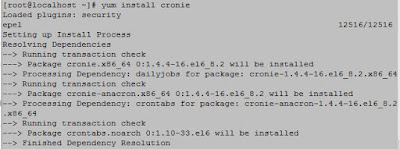
How to install crontab in linux system step by step guide


After installing the cronie package we need to verify it it is installed or nor. To verify it we execute the below command.

[root@localhost ~]# rpm -qa cronie
cronie-1.4.4-16.el6_8.2.x86_64

How to start cron service

To start cron service we execute the below command.

[root@localhost ~]# service crond start
Starting crond:                                            [  OK  ]

To start the cron service automatically after booting the system we need to execute the below command.

[root@localhost ~]# chkconfig crond on


How to add crontab to execute a task automatically


We can schedule a task on a regular interval using crontab utility. To add a specific task to execute automatically on a regular interval we can do it using the below command.
#crontab –e

For a particular user we can set crontab using the below command.
#crontab –u username –e

How to list crontab which we have added to execute automation task


After adding crontab we need to verify the crontab using the below command.
#crontab –l

For a particular user we can list crontab using the below command.
#crontab –u username –l


How to configure fibre channel over Ethernet on linux step by step guide


How to configure fibre channel over Ethernet on linux step by step guide

In this article we learn how to configure fibre channel oner Ethernet on linux system step by step.

What is FCoE

FcoE is a storage protocol which established a communication of the fibre channel over the Ethernet and encapsulated fibre channel frame over the Ethernet.


Pre-requisite of LAB to configure fibre channel over Ethernet on linux

We need two packages to configure fibre channel over Ethernet on linux. one is fcoe-utils and other is lldpad. If these two packages are not installed into the system we nedd to install these two packages to configure FCoE on linux system.

To install these two packages into the linux system we execute the below command.

#yum install fcoe-utils lldpad –y

Procedure to configure fibre channel over Ethernet on linux

Step1: After installing these two packages, there is a default file ifcfg-ethx which is located at /etc/fcoe. We have to copy this file to our desired interface.
Suppose our desire interface is ifcfg-ethy. So we execute the below command.

#cp /etc/fcoe/ifcfg-ethx /etc/fcoe/ifcfg-ethy

Step2: After doing this we edit the  /etc/fcoe/ifcfg-ethy file and change the DCB_REQUIRED parameter value to NO(if dcbclient is not required). By default this parameter value set to yes.

How to configure fibre channel over Ethernet on linux step by step guide

How to configure fibre channel over Ethernet on linux step by step guide


Step3: Now go to the /etc/sysconfig/network-scripts directory and select your desired interface which you are going to configure as FCoE and edit the interface and change onboot parameter to yes to enable the startup mode.

Step4: now start the lldpad service and fcoe service and also enable these service at the startup mode to execute the below command.

#service lldpad start;service fcoe start
#chkconfig lldpad on;chkconfig fcoe on

Step5: Now check your configuration is it successfuly configured or not to execute the below command.

#fcoeadm -i


Please Donate To Bitcoin Address: [[address]]
Donation of [[value]] BTC Received. Thank You.
[[error]]