Install phpMyAdmin
CentOS 7 | In this tutorial we will learn how to install
latest phpMyAdmin on CentOS 7. We can install phpMyAdmin in two ways . One is
from the source file and other is from EPEL repository.
What is phpMyAdmin
phpMyAdmin is open source and free web
application which is used to mange MySQL database and MariaDB database and it
was written in php language and it is very famous tool for database administrator to mange MySQL
database using the GUI interface.
Install phpMyAdmin using source file
Step 1) To install phpMyAdmin using source file
first we need to download the source file using the wget command as per below
instruction.
we will
download the source file in /usr/share directory.
[root@techrideradmin
share]# wget
https://files.phpmyadmin.net/phpMyAdmin/4.9.1/phpMyAdmin-4.9.1-all-languages.zip
--2019-09-22
12:34:36--
https://files.phpmyadmin.net/phpMyAdmin/4.9.1/phpMyAdmin-4.9.1-all-languages.zip
Resolving
files.phpmyadmin.net... 89.187.162.19
Connecting
to files.phpmyadmin.net|89.187.162.19|:443... connected.
HTTP
request sent, awaiting response... 200 OK
Length:
11349731 (11M) [application/zip]
Saving
to: “phpMyAdmin-4.9.1-all-languages.zip”
100%[======================================>]
11,349,731 229K/s in 40s
2019-09-22
12:35:17 (277 KB/s) - “phpMyAdmin-4.9.1-all-languages.zip” saved
[11349731/11349731]
Step2) After
download the source file we need to unzip the zipped source file using the
below command.
[root@techrideradmin
share]# unzip phpMyAdmin-4.9.1-all-languages.zip
Step3) Now we need to
rename the file using the below command.
[root@techrideradmin
share]# mv phpMyAdmin-4.9.1-all-languages phpMyAdmin
Step4) Now we need to
change the ownership and permission of the file using the below command.
[root@techrideradmin
share]# chown –R apache:apache
phpMyAdmin
[root@techrideradmin
share]# chmod -R 755 phpMyAdmin
Step5) Now we need to
create phpMyAdmin configuration file
named “phpMyAdmin.conf” into the
/etc/httpd/conf.d directory and paste
the below code into the configuration file to access phpMyAdmin web page from
emote machine to manage MySQL server.
Alias
/phpMyAdmin /usr/share/phpMyAdmin
Alias
/phpmyadmin /usr/share/phpMyAdmin
<Directory
“/usr/share /phpMyAdmin”>
Order
Deny,Allow
Deny
from all
Allow
from 192.168.137.1(your workstation ip address)
</Directory>
Step6) Now we need to
restart the httpd service using the below command.
[root@techrideradmin
share]#systemctl restart httpd
Step7) Now we can
access the phpMyAdmin web page using the below url from your
workstation. In my case my Mysql server ip 192.168.137.5.
192.168.137.5/phpMyAdmin
Install phpMyAdmin with apache on CentOS
7
In this section we will
learn how to install phpMyAdmin on CentOS 7 without using source file.
Before installing phpMyAdmin we need to check
the prerequisite of the CentOS 7 server . As phpMyAdmin is basically written by php language so we need to
install LAMP stack on the server. To install LAMP (Linux, Apache, MySQL,Php)
stack you can follow the following link.
Step 1) First we need
to install phpMyAdmin package on the
CentOS 7 server . But this package
is not available on the CentOS 7 default repo. So we need to install EPEL repo
on his server.
Step 2) After
installing EPEL repo we need to install
phpMyAdmin package from the EPEL repo using the below command.
[root@techrideradmin
~]#yum install phpmyadmin
Step 3) After
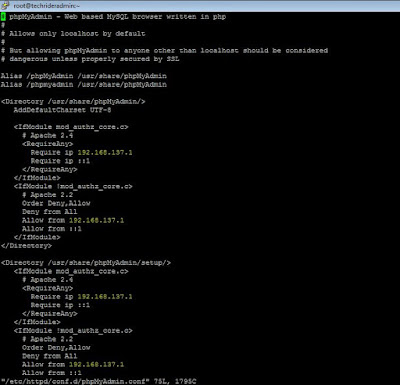
installing this package we have to go the configuration file which is located
at “/etc/httpd/conf.d/phpMyAdmin.conf” to
configure phpMyAdmin to access from
the remote machine.
 |
| Configuration file of phpMyAdmin |
From the above picture we need to change this
four lines with my remote machine ip address .
Step 4) Finally we
need to restart the apache server to take affect using the below command.
[root@techrideradmin
]#systemctl restart httpd
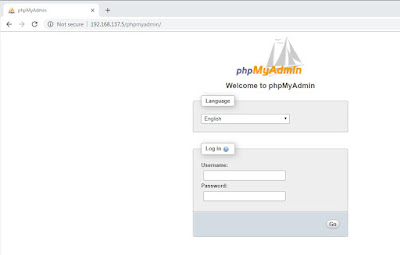
Now we can access my phpMyAdmin web page from my remote
machine using the below url.
After getting access to
login phpMyAdmin web page we can use MySQL server username and password in the
username and password field.
Now we have
successfully installed phpMyAdmin to manage MySQL database.


0 comments:
Post a Comment