How to create user in MySQL and grant all privileges


Create user in MySQL 5.6/5.7/8| In this tutorial we will learn how to create user in mysql,create user in MySQL database using MySQL workbench,how to change mysql user password,how to show all users list in mysql,how to grant privileges to mysql user,how to revoke privileges from mysql user,how to delete mysql user.


    What is  Mysql

    MySQL is free and open source most popular and well known relational database management system all over the world. It is used for various web based software application.


    Create user in mysql

    After installing mysql database in our system first we login into database through root user and password.

    # mysql -u root -p

     By this user credential we can do any operational tasks (like create a database, create a table, insert data into tables, update data into tables, delete row from the table, drop a table, delete a database) on our database as root user is a superuser. 


    But in some organization there is a restriction for these operation tasks as a normal user. In that case grant privileges plays an important role to restricts these users providing privileges for doing these operational tasks.

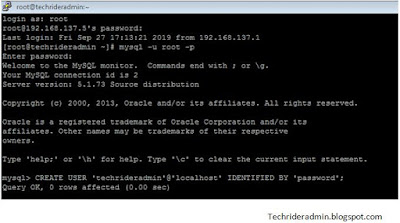
    Now question is arising how do I create a new user in MySql.To solve this question first we need to create user in mysql 5.6/5.7/8. we can create a user in mysql using the below command. 

    CREATE USER 'username'@'hostname' IDENTIFIED BY 'password';
    Create user in MySQL
    Create user in MySQL

    In the above command username denotes that the name of the user which need to be added in the database and hostname denotes the hostname or ipaddress  from which this user can access the database and password denotes that user password to access the database. From the above command we can create a mysql username and password.


    Create user in MySQL workbench and grant privileges

    We can also create a user in MySQL 5.6/5.7/8.using MySQL workbench and grant privileges to restrict for operational tasks on MySQL database. We will describe the below process to create new mysql user and grant privileges .

    Step 1) First login MySQL workbench with the root privileges.

    Step2)After login the MySQL workbench we found an option in the left side of the management section that is Users and privileges. Now click on that option.After clicking it a users and privileges wizard will be appear on our screen. Now click on the add account option at bottom.


    Step3) After click on add account option we need to fill the new user details which to be added in the mysql database in the login tab. In this section we need to fill some details like login name(name of the user),Limit to Hosts matching(From which machine the user want to access the database and password for the user.
    Add user account option in mysql workbench,create user in mysql using mysql workbench
    Add user account option in mysql workbench


    Step4 ) You can set the account limit for the user in account limit tab. In this tab you can limit how many queries, update queries the user can be executed in an hour and how many time the user can be connect in the system.In my can we define user can execute the queries 12 per hours and 5 times user can connect the system.
    User account limit,create user in mysql using mysql workbench
    User account limit


    Step5) In the next tab you can define which administrative role is suitable for the user. You can set the administrative roles for the user. In my case we select dba role for the user.
    create user in mysql using mysql workbench,Administrative roles
    Administrative roles


    Step6) The next tab is schema privileges. If the user is not in dba role you can define the schema which user can access and give right to operate on that sehema.


    Step7 ) Then apply the below tab to create a new user in mysql database using mysql workbench. 

    MySQL list users


    After creating the user into the mysql database to show all users in mysql 5.6/5.7/8.we need to execute the below command to view all mysql user account.
    mysql> SELECT * from mysql.user;


    We can view the host,user and password details of the particular users using the where clause. To view these details for the “techrideradmin” user we can use the below command.
    mysql> Select host,user,password from mysql.user where user = 'techrideradmin';
    MySQL list users,create user in MySQL
    MySQL list users

    To describe the user table we can use the below command.
    mysql> Describe mysql.user;

    To view particular column we can use the below command
    mysql> Select <column_name> from mysql.user;


    How to change MySQL user password

    If a user forget his password to access the database a database admin can change  password from the database server by his root privileges. To change database password we need to execute the below command.
    mysql> SET PASSWORD FOR 'techrideradmin'@'localhost' = PASSWORD('newpassword');
    Query OK, 0 rows affected (0.00 sec)

    Now the password has been changed from password to newpassword.


    How to grant privileges for MySQL user

    We can restrict a user to operate on database  by grant privilegesAccount privileges is very important task for a database admin to restrict a user to operate on database.


    Case 1)  suppose we have a database user techrideradmin and we want to give him  full privileges by which this user can do any operational tasks on all databases. To  set privileges on database we need to execute the below command.


    mysql> grant all privileges on *.* to 'techrideradmin'@'localhost' identified by 'newpassword';
    Query OK, 0 rows affected (0.00 sec)

    In the above command first * denotes the database name and the second * denotes the table name. we are using * that means this user has full privileges (can access all databases and tables).


    Localhost identified by password means we create mysql user in local server and we set password using identified by statement.


    After executing above command we need to execute flush privileges command.


    Case 2) suppose we have one database called techrideradmin and one table into it called student . If we want to give permission for the particular database and table we need to execute the below command.

    mysql>  grant all privileges on techrideradmin.student to 'techrideradmin'@'localhost' identified by 'newpassword';
    Query OK, 0 rows affected (0.01 sec)

    Case 3) If we want to allow this user for the remote host we can use the below command. Suppose my server ip address 192.168.137.5 and my workstation ip address 192.168.137.1 . we want to  access the database using my workstation for do this we need to execute the below command.

    mysql> grant all privileges on techrideradmin.student to 'techrideradmin'@'192.168.137.5' identified by 'newpassword';
    Query OK, 0 rows affected (0.00 sec)

    There are different type of privileges
    1)ALL PRIVILEGES----Permit full permission to user.

    mysql> grant all privileges on *.* to 'techrideradmin'@'localhost' identified by 'newpassword';

    2)CREATE--------------Give permission to create database and table.

    mysql> grant create on *.* to 'techrideradmin'@'localhost' identified by 'newpassword';


    3)SELECT--------------Give permission to view the details of the table data.

    mysql> grant select  on *.* to 'techrideradmin'@'localhost' identified by 'newpassword';

    4)UPDATE--------------Give permission to update the data into the table

    mysql> grant update on *.* to 'techrideradmin'@'localhost' identified by 'newpassword';

    5)INSERT---------------Give permission to insert data into table.

    mysql> grant insert  on *.* to 'techrideradmin'@'localhost' identified by 'newpassword';

    6)DELETE---------------Give permission to delete data from table.

    mysql> grant delete on *.* to 'techrideradmin'@'localhost' identified by 'newpassword';

    7)DROP-----------------Give permission to drop table and database.

    mysql> grant drop on *.* to 'techrideradmin'@'localhost' identified by 'newpassword';

    Make a MySql user readonly


    Now lets take an example to create a mysql user readonly we can use SELECT privileges.Suppose we are going to create techrideradmin as readonly user. To create readonly user in mysql we will execute the below command.

    mysql> grant select  on *.* to 'techrideradmin'@'localhost' identified by 'newpassword';

    After executing the above command techrideradmin user has became a readonly user for all databases.


    Show grants for mysql user


    Show grants command is used to find all provided grant information for a user.Here my username is techrideradmin and hostname is localhost so to view all grant info for that user using below command.


    mysql> show grants for ‘techrideradmin’@’localhost’;


    How to revoke privileges for MySQL user


    To revoke the privileges for the mysql user we need to execute the below command.
    mysql> revoke all privileges on *.* from 'techrideradmin'@'localhost' identified by 'newpassword';
    Query OK, 0 rows affected (0.00 sec)

    After executing the above command all privileges has been revoked from this user.

    Delete user in mysql

    Now we want to delete user(techriderradmin) from mysql 5.6/5.7/8. database. To delete this user we need to execute the below command. After executing the below command this user has been dropped forever from the database.
    mysql> drop user 'techrideradmin'@'localhost';
    Query OK, 0 rows affected (0.00 sec)


    In this article we learned how to add a user in mysql 5.6/5.7/8.  ,how to change mysql user password,how to show all users list in mysql,how to grant privileges,how to revoke privileges,how to delete mysql user.

    Stay tune with us for more update.😀😀😀

    How to install latest phpMyAdmin on CentOS 7


    Install phpMyAdmin CentOS 7 | In  this tutorial we will learn how to install latest phpMyAdmin on CentOS 7. We can install phpMyAdmin in two ways . One is from the source file and other is from EPEL repository.

    What is phpMyAdmin

    phpMyAdmin is open source and free web application which is used to mange MySQL database and MariaDB database and it was written in php language and it is very famous tool  for database administrator to mange MySQL database using the GUI interface.


    Install phpMyAdmin using source file


    Step 1) To install phpMyAdmin using source file first we need to download the source file using the wget command as per below instruction.
    we will download the source file in /usr/share directory.


    [root@techrideradmin share]# wget https://files.phpmyadmin.net/phpMyAdmin/4.9.1/phpMyAdmin-4.9.1-all-languages.zip
    --2019-09-22 12:34:36--  https://files.phpmyadmin.net/phpMyAdmin/4.9.1/phpMyAdmin-4.9.1-all-languages.zip
    Resolving files.phpmyadmin.net... 89.187.162.19
    Connecting to files.phpmyadmin.net|89.187.162.19|:443... connected.
    HTTP request sent, awaiting response... 200 OK
    Length: 11349731 (11M) [application/zip]
    Saving to: “phpMyAdmin-4.9.1-all-languages.zip”

    100%[======================================>] 11,349,731   229K/s   in 40s

    2019-09-22 12:35:17 (277 KB/s) - “phpMyAdmin-4.9.1-all-languages.zip” saved [11349731/11349731]

    Step2) After download the source file we need to unzip the zipped source file using the below command.
    [root@techrideradmin share]# unzip phpMyAdmin-4.9.1-all-languages.zip


    Step3) Now we need to rename the file using the below command.
    [root@techrideradmin share]# mv phpMyAdmin-4.9.1-all-languages phpMyAdmin


    Step4) Now we need to change the ownership and permission of the file using the below command. 
    [root@techrideradmin share]# chown –R  apache:apache phpMyAdmin
    [root@techrideradmin share]# chmod  -R 755 phpMyAdmin


    Step5) Now we need to create phpMyAdmin configuration file named “phpMyAdmin.conf”  into the /etc/httpd/conf.d  directory and paste the below code into the configuration file to access phpMyAdmin web page from emote machine to manage MySQL server.

    Alias /phpMyAdmin /usr/share/phpMyAdmin
    Alias /phpmyadmin /usr/share/phpMyAdmin

    <Directory “/usr/share /phpMyAdmin”>
    Order Deny,Allow
    Deny from all
    Allow from 192.168.137.1(your workstation ip address)
    </Directory>


    Step6) Now we need to restart the httpd service using the below command. 
    [root@techrideradmin share]#systemctl restart httpd

    Step7) Now we can access the phpMyAdmin  web page using the below url from your workstation. In my case my Mysql server ip 192.168.137.5.

    192.168.137.5/phpMyAdmin

     Install phpMyAdmin with apache on CentOS 7


    In this section we will learn how to install phpMyAdmin  on CentOS 7 without using source file.

    Before installing phpMyAdmin we need to check the prerequisite of the CentOS 7 server . As phpMyAdmin is basically written by php language so we need to install LAMP stack on the server. To install LAMP (Linux, Apache, MySQL,Php) stack you can follow the following link.


    Step 1) First we need to install phpMyAdmin package on the CentOS 7 server . But this package is not available on the CentOS 7 default repo. So we need to install EPEL repo on his server.


    Step 2) After installing EPEL repo we need to install phpMyAdmin package from the EPEL repo using the below command. 
    [root@techrideradmin ~]#yum install phpmyadmin


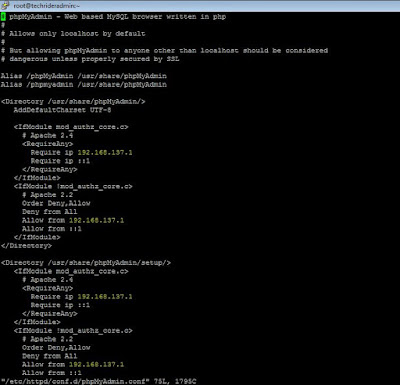
    Step 3) After installing this package we have to go the configuration file which is located at  “/etc/httpd/conf.d/phpMyAdmin.conf” to configure phpMyAdmin to access from the remote machine.
    Configuration file of phpMyAdmin,Install phpMyAdmin CentOS 7
    Configuration file of phpMyAdmin


     From the above picture we need to change this four lines with my remote machine ip address .

    Step 4) Finally we need to restart the apache server to take affect using the below command.
    [root@techrideradmin ]#systemctl restart httpd

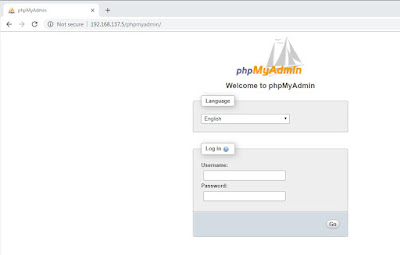
    Now we can access my phpMyAdmin web page from my remote machine using the below url.

    192.168.137.5/phpMyAdmin
    Install phpMyAdmin CentOS 7
    Install phpMyAdmin CentOS 7

    After getting access to login phpMyAdmin web page we can use MySQL server username and password in the username and password field.

    Now we have successfully installed phpMyAdmin to manage MySQL database.

    INSERT ,UPDATE and DELETE Query in MySQL


    INSERT ,UPDATE and DELETE Query in MySQL | In this tutorial we will learn how to insert value in MySQL  using insert query,update value in MySQL  using update query,delete row in MySQL  using delete query.


      INSERT Query in MySQL


      Insert query in mySql is very important staff for an administrator in an organization when a  employee join an organization his or her record has to be maintained by an organization or a student got admission to school his or her has to be maintained in that place insert query is required.

      Syntax for INSERT Query in MySQL


      mysql> INSERT INTO tablename( column 1,column 2...column N) VALUES ("value 1" ,"value 2",...value N) ;

      From the  above syntax we can know few details.

      1. INSERT INTO statement is used to insert records in the tables of the database.

      2. In the Tablename field we use the tablename in which table records to be inserted.

      3. Column 1,Column 2...Column N  indicates here column name of the table.

      4. Need to write VALUES statement to insert the values in the column of the table.

      5."value 1" ,"value 2",...value N indicates the values according to the column name. If datatype of the column is varchar then we use "" sign and if datatype of the column is integer then we need not use "" sign. 


      To insert value into mysql table we use “insert into” command. First we need to login mysql server, then select mysql database and insert the value into the specific table using the below command.


      mysql> INSERT INTO student (studentfirstname, studentlastname,studentage) VALUES ("Raktim", "Sharma",23);
      Query OK, 1 row affected, 1 warning (0.00 sec)

      We can not define student roll no because it will be incremented automatically.Now data has been inserted into mysql table named student.


      INSERT Query in MySQL using  MySQL workbench


      We can also insert query using the MySQL workbench. First login the workbench using the credentials and then find the schemas or database and also the table in which data to be inserted. Then we need to go the query section and execute the insert query and after executing the query we got the output in the output section.
      INSERT Query in MySQL using  MySQL workbench

                                  INSERT Query in MySQL using  MySQL workbench


      We can also check the output from MySQL promt from the server that data is inserted or not.
      INSERT Query in MySQL

                                                  INSERT Query in MySQL


      UPDATE Query in MySQL


      Update query in MySQL  is also very important for a database admin when an employee promoted then as per his designation record should be updated. In that place update query is required.


      To update record into mysql table we use “update” command. Lets take an example to update data in the student table which we previously created.

      Before update to view the table data using the below command.

      mysql> select * from student;
      +----------------+------------------+-----------------+------------+
      | studentnrollno | studentfirstname | studentlastname | studentage |
      +----------------+------------------+-----------------+------------+
      |              0 | Raktim           | Sharma          |         23 |
      |              1 | ashish           | khan            |         25 |
      +----------------+------------------+-----------------+------------+
      2 rows in set (0.00 sec)


      Syntax for update Query in MySQL

      mysql> UPDATE Tablename SET Columnname  =Value WHERE [Condition];

      From the  above syntax we can know few details.

      1. UPDATE  statement is used to update record in the tables of the database.

      2. In the Tablename field we use the tablename in which table records to be updated.

      3. Column name   indicates here column name of the table which column will be updated.

      4. Then we use WHERE clause along with the condition to filter the data which row will be updated.


      Now we are going to update the last name of the student whose roll no is 1. To do this we use the below command.

      mysql> UPDATE student SET studentlastname = 'Ali' WHERE studentnrollno = 1;
      Query OK, 1 row affected (0.00 sec)
      Rows matched: 1  Changed: 1  Warnings: 0

      Here we used where clause to update record for a particular student.

      After modified the date we need to view the data using the below command.
      UPDATE Query in MySQL

                                                     UPDATE Query in MySQL


      UPDATE Query in MySQL using MySQL workbench


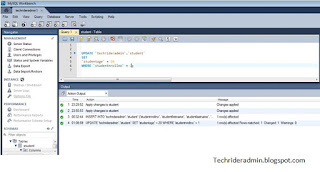
      We can also update query using the MySQL workbench. First login the workbench using the credentials and then find the schemas or database and also the table in which data to be updated. Then we need to go the query section and execute the update query and after executing the query we got the output in the output section.
      UPDATE Query in MySQL using MySQL workbench

                                     UPDATE Query in MySQL using MySQL workbench


      DELETE Query in MySQL


      Delete query is also very important for a database admin when an employee leave the organization or a student leave from school ,in that case delete query is required.
      To delete record from the mysql table using delete query we use”DELETE FROM”command as below.

      Lets take an example to delete the date which we previously created.

      Before delete to view the table data using the below command.

      +----------------+------------------+-----------------+------------+
      | studentnrollno | studentfirstname | studentlastname | studentage |
      +----------------+------------------+-----------------+------------+
      |              0 | Raktim           | Sharma          |         23 |
      |              1 | ashish           | Ali             |         25 |
      +----------------+------------------+-----------------+------------+
      2 rows in set (0.00 sec)


      Syntax for Delete Query in MySQL

      mysql> DELETE FROM Tablename  WHERE [Condition];

      From the  above syntax we can know few details.

      1. DELETE FROM   statement is used to update record in the tables of the database.

      2. In the Tablename field we use the tablename from which table records to be deleted.

      3. Then we use WHERE clause along with the condition to filter the data which row will be deleted.

      Now we are going to delete the data of the student whose roll no is 1. To do this we use the below command.

      mysql> DELETE FROM student WHERE studentnrollno=1;
      Query OK, 1 row affected (0.00 sec)

      After deleted the date we need to view the data using the below command.
      DELETE Query in MySQL

                                                  DELETE Query in MySQL


      DELETE Query in MySQL using MySQL workbench


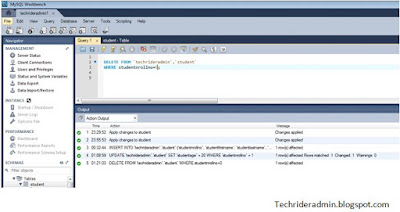
      We can also delete query using the MySQL workbench. First login the workbench using the credentials and then find the schemas or database and also the table in which data to be deleted. Then we need to go the query section and execute the delete query and after executing the query we got the output in the output section.
      DELETE Query in MySQL using MySQL workbench

                                 DELETE Query in MySQL using MySQL workbench


      That’s all.If this article is helpful to know about INSERT ,UPDATE and DELETE Query in MySQL please share and subscribe the article!!!!


      How to Create Database,Table In MySQL


      Create Database,Table In Mysql | In this tutorial we learn how to create database in MySQL and how to create table in MySQL .


        Create Database in MySQL

        To create  database in mysql  we require special privileged.To create mysql database we are using root user and login the mysql server and execute the below create database in mysql  command to create mysql database through mysql promt.


        [root@localhost ~]# mysql -uroot -p
        Enter password:
        Welcome to the MySQL monitor.  Commands end with ; or \g.
        Your MySQL connection id is 2
        Server version: 5.1.73 Source distribution

        Copyright (c) 2000, 2013, Oracle and/or its affiliates. All rights reserved.

        Oracle is a registered trademark of Oracle Corporation and/or its
        affiliates. Other names may be trademarks of their respective
        owners.

        Type 'help;' or '\h' for help. Type '\c' to clear the current input statement.

        mysql> create database techrideradmin;
        Query OK, 1 row affected (0.00 sec)

        Create Database in MySQL

        Create Database in MySQL


        Now database has been created after executing the above command.


        Create  MySQL Database using phpMyAdmin

        We can also create   MySQL database using phpMyAdmin web based application. To create MySQL database   using  phpMyAdmin we need to follow the below steps.
        If you don’t install phpMyAdmin in your system you can follow the below link to install phpMyAdmin .

        Step1 )  First we need to login phpMyAdmin web page using root credential which was created  at the time of mysql sever installation . we need to use same mysql root username and password for login phpMyAdmin page.


        Step 2) After login we need to go the database tab which is located at the top of the wizard. Now press the database tab ,after pressing the tab we found create database field in which we need to enter the name of the database which we want to create and leave other field as default and then press the create button. After that the database  will be created and you can view the database at the left side.
        Create mysql  database using phpMyAdmin,create database in mysql
        Create database using phpMyAdmin

        List MySQL Database

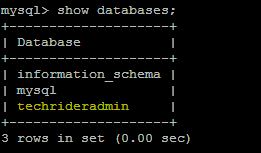
        After creating database we can list the databases using below command through mysql promt.

        mysql> show databases;
        +--------------------+
        | Database           |
        +--------------------+
        | information_schema |
        | mysql              |
        | techrideradmin     |
        +--------------------+
        3 rows in set (0.00 sec)


        If there are many databases ,to find the particular database  we can use LIKE clause.
        The syntax will be :

        mysql> show databases LIKE ‘tech%’;

        After executed the above command all database will be appear which will start with “tech”.

        MySQL Select Database

        After connected the mysql server we need to select database with which we are working among all databases on the mysql server. To select the database we execute “use” command .
        Among many databases to work with particular database we need to use "use" command.

        To select MySQL database we login the mysql server and execute the below command.


        [root@localhost ~]# mysql -uroot -p

        Enter password:

        Welcome to the MySQL monitor.  Commands end with ; or \g.

        Your MySQL connection id is 2

        Server version: 5.1.73 Source distribution


        Copyright (c) 2000, 2013, Oracle and/or its affiliates. All rights reserved.


        Oracle is a registered trademark of Oracle Corporation and/or its

        affiliates. Other names may be trademarks of their respective

        owners.


        MySQL Select Database
        Type 'help;' or '\h' for help. Type '\c' to clear the current input statement.


        mysql> use techrideradmin

        Database changed

                                                      MySQL Select Database


        Create table in MySQL

        Lets take a create table in MySQL  example .
        Suppose we are going to create a mysql table named “student”. 

        To create table in MySQL we execute the below command.

        create table student(

           studentnrollno INT NOT NULL AUTO_INCREMENT,

           studentfirstname VARCHAR(30) NOT NULL,

           studentlastname VARCHAR(30) NOT NULL,

           PRIMARY KEY ( studentnrollno )

        );


        After executing  the above command we create table in mysql with primary key  called student which has three field one is studentrollno, second is student firstname and then student last name and we define student rollno  as a primary key. We use NOT NULL which pevent to entry null value and student roll no increment automatically using the AUTO_INCREMENT keyword.


        To execute the above command we need to login mysql server and after getting the mysql  promt we need to execute the create table in mysql  command as below.


        mysql> create table student(

            ->    studentnrollno INT NOT NULL AUTO_INCREMENT,

            ->    studentfirstname VARCHAR(30) NOT NULL,

            ->    studentlastname VARCHAR(30) NOT NULL,

            ->    PRIMARY KEY ( studentnrollno )

            -> );

        Query OK, 0 rows affected (0.02 sec)
        Create table in MySQL

                                                         Create table in MySQL


        Create table in MySQL using MySQL workbench

        We can also  create table in MySQL workbench. Lets follow the below steps.

        Step1) first we create a connection in the Mysql workbench providing the details.We need to define connection name ,connection method, server hostname or ip address, port no and username which you have to allow to the server for the remote connection along with the particular database. Then we login the tool to manage our database.
        Create table in MySQL using MySQL workbench

                                       Create table in MySQL using MySQL workbench


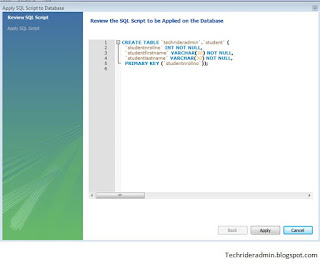
        Setp2) After that  we can create a table (in my case student)  into our database(in my case techrideradmin). Now we add the column name ,define the data type and  primary key and null value.
        Create table in MySQL using MySQL workbench

                                       Create table in MySQL using MySQL workbench


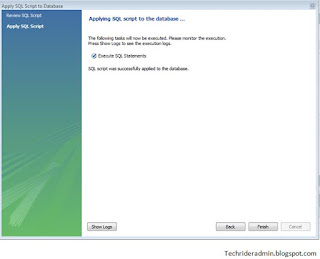
        Step3) After that we click on the apply button and found the below screen and then click the finish button to create the table.
        Create table in MySQL using MySQL workbench

                                       Create table in MySQL using MySQL workbench


        Create table in MySQL using MySQL workbench
        add new column
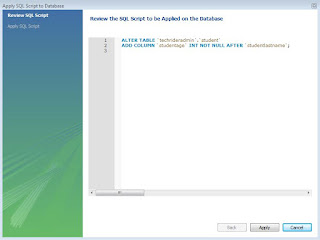
        Also we can add column after crate a table .we add the extra column in column name section and then apply for add the new column for an existing table.

        That’s all.If this article is helpful to know about Create Database in MySQL,Select Database in MySQL,List Database in MySQL,Create Table In Mysql primary key, please share and subscribe the article!!!!