How to install webmin on CentOS 7 step by step guide


How to install webmin on CentOS 7 step by step guide

In this article we learn what is webmin, how to install webmin on CentOS 7 and how to access it through the web browser.

What is webmin

Webmin is the open source most popular hosting control panel. Webmin is a web based interface for the unix based server used by system admin to manage the whole linux system using this web based interface. Normally webmin depends on the perl language and by default it is running on TCP port 10000.

Installation steps of webmin on CentOS 7


To install the webmin first we need to install wget .To install wget package we execute the below command.

[root@localhost ~]# yum install wget -y
Loaded plugins: fastestmirror
Loading mirror speeds from cached hostfile
 * base: centos.excellmedia.net
 * extras: centos.excellmedia.net
 * updates: centos.excellmedia.net
Resolving Dependencies
--> Running transaction check
---> Package wget.x86_64 0:1.14-18.el7 will be installed
--> Finished Dependency Resolution

Dependencies Resolved

========================================================================================================================================================================
 Package                               Arch                                    Version                                      Repository                             Size
========================================================================================================================================================================
Installing:
 wget                                  x86_64                                  1.14-18.el7                                  base                                  547 k

Transaction Summary
========================================================================================================================================================================
Install  1 Package

Total download size: 547 k
Installed size: 2.0 M
Downloading packages:
wget-1.14-18.el7.x86_64.rpm                                                                                                                      | 547 kB  00:00:02
Running transaction check
Running transaction test
Transaction test succeeded
Running transaction
  Installing : wget-1.14-18.el7.x86_64                                                                                                                              1/1
  Verifying  : wget-1.14-18.el7.x86_64                                                                                                                              1/1

Installed:
  wget.x86_64 0:1.14-18.el7

Complete!

After installing the wget package we create a repo file under “/etc/yum.repos.d” name webmin.repo and add the below line in the repo file.

[root@localhost ~]# cat  /etc/yum.repos.d/webmin.repo
[Webmin]
name=Webmin Distribution Neutral
mirrorlist=http://download.webmin.com/download/yum/mirrorlist
enabled=1

To fetch the GPG key we execute the below command.

[root@localhost ~]# wget http://www.webmin.com/jcameron-key.asc
--2018-12-18 22:20:57--  http://www.webmin.com/jcameron-key.asc
Resolving www.webmin.com (www.webmin.com)... 216.105.38.10
Connecting to www.webmin.com (www.webmin.com)|216.105.38.10|:80... connected.
HTTP request sent, awaiting response... 200 OK
Length: 1320 (1.3K) [text/plain]
Saving to: ‘jcameron-key.asc’

100%[==============================================================================================================================>] 1,320       --.-K/s   in 0s

2018-12-18 22:20:58 (43.5 MB/s) - ‘jcameron-key.asc’ saved [1320/1320]
After fetching the GPG key now it is the time to install the key to sign the webmin package.

[root@localhost ~]# rpm --import jcameron-key.asc

After import the key we execute the below command to install the webmin package

[root@localhost ~]# yum install webmin
Loaded plugins: fastestmirror
Webmin                                                                                                                                           | 2.9 kB  00:00:00
Webmin/primary_db                                                                                                                                |  87 kB  00:00:02
Loading mirror speeds from cached hostfile
 * base: centos.excellmedia.net
 * extras: centos.excellmedia.net
 * updates: centos.excellmedia.net
Resolving Dependencies
--> Running transaction check
---> Package webmin.noarch 0:1.900-1 will be installed
--> Processing Dependency: perl(Net::SSLeay) for package: webmin-1.900-1.noarch
--> Processing Dependency: perl(Encode::Detect) for package: webmin-1.900-1.noarch
--> Running transaction check
---> Package perl-Encode-Detect.x86_64 0:1.01-13.el7 will be installed
---> Package perl-Net-SSLeay.x86_64 0:1.55-6.el7 will be installed
--> Finished Dependency Resolution

Dependencies Resolved

========================================================================================================================================================================
 Package                                         Arch                                Version                                  Repository                           Size
========================================================================================================================================================================
Installing:
 webmin                                          noarch                              1.900-1                                  Webmin                               21 M
Installing for dependencies:
 perl-Encode-Detect                              x86_64                              1.01-13.el7                              base                                 82 k
 perl-Net-SSLeay                                 x86_64                              1.55-6.el7                               base                                285 k

Transaction Summary
========================================================================================================================================================================
Install  1 Package (+2 Dependent packages)

Total download size: 21 M
Installed size: 79 M
Is this ok [y/d/N]: y
Downloading packages:
(1/3): perl-Encode-Detect-1.01-13.el7.x86_64.rpm                                                                                                 |  82 kB  00:00:02
(2/3): perl-Net-SSLeay-1.55-6.el7.x86_64.rpm                                                                                                     | 285 kB  00:00:03
(3/3): webmin-1.900-1.noarch.rpm                                                                                                                 |  21 MB  00:04:18
------------------------------------------------------------------------------------------------------------------------------------------------------------------------
Total                                                                                                                                    85 kB/s |  21 MB  00:04:19
Running transaction check
Running transaction test
Transaction test succeeded
Running transaction
  Installing : perl-Encode-Detect-1.01-13.el7.x86_64                                                                                                                1/3
  Installing : perl-Net-SSLeay-1.55-6.el7.x86_64                                                                                                                    2/3
Operating system is CentOS Linux
  Installing : webmin-1.900-1.noarch                                                                                                                                3/3
Webmin install complete. You can now login to https://localhost.localdomain:10000/
as root with your root password.
  Verifying  : webmin-1.900-1.noarch                                                                                                                                1/3
  Verifying  : perl-Net-SSLeay-1.55-6.el7.x86_64                                                                                                                    2/3
  Verifying  : perl-Encode-Detect-1.01-13.el7.x86_64                                                                                                                3/3

Installed:
  webmin.noarch 0:1.900-1

Dependency Installed:
  perl-Encode-Detect.x86_64 0:1.01-13.el7                                              perl-Net-SSLeay.x86_64 0:1.55-6.el7

Complete!

How to start and enable the webmin service

To start the webmin service we execute the below command.
[root@localhost ~]# systemctl start webmin

To enable the service we execute the below command.

[root@localhost ~]# systemctl enable webmin

How to verify using web browser

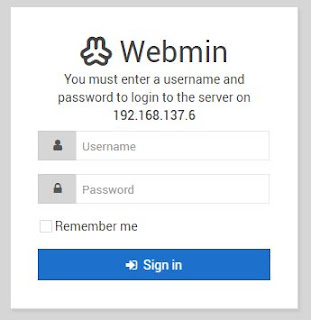
By default webmin is running on the TCP pot no 10000 . To verify webmin service open the web browser and type https:// <server_ip>:10000 and you will get the below output.

 
How to install webmin on CentOS 7 step by step guide
How to install webmin on CentOS 7 step by step guide 

Simple step by step guide how to assign multiple ip addresses to single NIC in RHEL/CentOS/Oracle (5/6/7)-IP Aliasing


Simple step by step guide how to assign multiple ip addresses to single NIC in RHEL/CentOS/Oracle (5/6/7):IP Aliasing

In this article we learn how to assign multiple ip addresses to single NIC in the linux system. Assigning multiple ip addresses to single NIC is called IP Aliasing. It is very important when we talk about IP based hosing. In the IP based hosting the requirement is multiple ip address ,we can do it using IP Aliasing. This is very cost effective solution.

Assigning multiple Ip addresses to single NIC step by step guide  

The interface configuration file located to “/etc/sysconfig/network-scripts”. In this file you can find the interface name like ifcfg-ethY .Here Y is the interface no.in my case I have one interface ifcfg-eth0 and going to assign multiple ip addresses on this interface.ifcfg-eth0 interface is already assign a ip address(192.168.137.3).now we create a sub interface under ifcfg-eth0 and assign the ip address(192.168.137.5).

To assign multiple ip addresses first we create sub interface to execute the below command.

#cd /etc/sysconfig/network-scripts
#cp ifcfg-eth0 ifcfgeth0:1

Now open the ifcfg-eth0:1 file and change the device name and ip address like this.

[root@localhost network-scripts]# cat ifcfg-eth0:1
DEVICE=eth0:1
HWADDR=08:00:27:B2:1C:2E
TYPE=Ethernet
UUID=7ad94a19-502b-4b87-8511-2293efc21cdb
ONBOOT=yes
IPADDR=192.168.137.5
PREFIX=24
GATEWAY=192.168.137.1
NM_CONTROLLED=yes
BOOTPROTO=static

After  doing the above steps to take affect the changing we need to restart the network service to execute the below command

#systemctl restart network

  
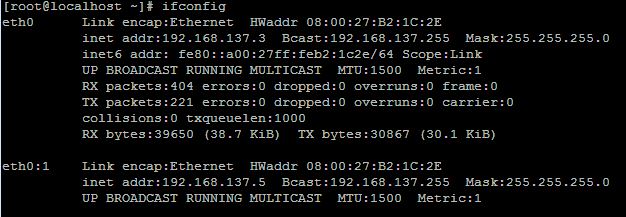
We can verify the configuration is properly configured or not using the below command.

[root@localhost ~]# ifconfig
eth0      Link encap:Ethernet  HWaddr 08:00:27:B2:1C:2E
          inet addr:192.168.137.3  Bcast:192.168.137.255  Mask:255.255.255.0
          inet6 addr: fe80::a00:27ff:feb2:1c2e/64 Scope:Link
          UP BROADCAST RUNNING MULTICAST  MTU:1500  Metric:1
          RX packets:404 errors:0 dropped:0 overruns:0 frame:0
          TX packets:221 errors:0 dropped:0 overruns:0 carrier:0
          collisions:0 txqueuelen:1000
          RX bytes:39650 (38.7 KiB)  TX bytes:30867 (30.1 KiB)

eth0:1    Link encap:Ethernet  HWaddr 08:00:27:B2:1C:2E
          inet addr:192.168.137.5  Bcast:192.168.137.255  Mask:255.255.255.0
          UP BROADCAST RUNNING MULTICAST  MTU:1500  Metric:1

Simple step by step guide how to assign multiple ip addresses to single NIC in RHEL/CentOS/Oracle (5/6/7) IP Aliasing

Simple step by step guide how to assign multiple ip addresses to single NIC in RHEL/CentOS/Oracle (5/6/7)- IP Aliasing


That’s all if this article is helpful please share this article!!!!!


How to install MariaDB on CentOS 7 linux step by step guide


How to install MariaDB on CentOS  7 linux step by step guide

In this article we learn what is MariaDB  and how to install MariaDB on CentOS 7 linux step by step.

What is MariaDB

MariaDB is one of the popular database server all over the world. MariaDB is free and open source database server which is drop-in replacement  for MySQL. Mariadb is used because  MariaDB is fast, reliable and robust database server.

Installation of MariaDB on CentOS 7

In this demonstration we install MariaDB on CentOS 7 using the default yum repositories. To install MariaDB on CentOS 7 we need to execute the below command.

#yum install mariadb-server mariadb
How to install MariaDB on CentOS  7 linux step by step guide
How to install MariaDB on CentOS  7 linux step by step guide


Start and enable MariaDB service on CentOS 7

To start and enable the MariaDB service on CentOS 7 we need to execute the below command.

#systemctl start mariadb
#systemctl enable mariadb

Setup firewall rule for MariaDB service on CentOS 7

CentOS 7  uses firewalld as a software firewall instead of iptables. By default MariaDB server is running on 3306 port. We need to allow this port into firewall rule to access it. To allow the incoming connection to the standard MySQL tcp port we need to execute the below command.

#firewall-cmd  - -permanent  - -add-service=mysql
#firewall-cmd  -- reload

To secure MariaDB we use “mysql_secure_installation” .After executing the “mysql_secure_installation” command we need to set root password,remove test database, remove anonymous user login and disable the remote login.

#mysql_secure_installation

NOTE: RUNNING ALL PARTS OF THIS SCRIPT IS RECOMMENDED FOR ALL MariaDB
      SERVERS IN PRODUCTION USE!  PLEASE READ EACH STEP CAREFULLY!

In order to log into MariaDB to secure it, we'll need the current
password for the root user.  If you've just installed MariaDB, and
you haven't set the root password yet, the password will be blank,
so you should just press enter here.

Enter current password for root (enter for none):
OK, successfully used password, moving on...

Setting the root password ensures that nobody can log into the MariaDB
root user without the proper authorisation.

Set root password? [Y/n] y
New password:
Re-enter new password:
Password updated successfully!
Reloading privilege tables..
 ... Success!


By default, a MariaDB installation has an anonymous user, allowing anyone
to log into MariaDB without having to have a user account created for
them.  This is intended only for testing, and to make the installation
go a bit smoother.  You should remove them before moving into a
production environment.

Remove anonymous users? [Y/n] y
 ... Success!

Normally, root should only be allowed to connect from 'localhost'.  This
ensures that someone cannot guess at the root password from the network.

Disallow root login remotely? [Y/n] y
 ... Success!

By default, MariaDB comes with a database named 'test' that anyone can
access.  This is also intended only for testing, and should be removed
before moving into a production environment.

Remove test database and access to it? [Y/n] y
 - Dropping test database...
 ... Success!
 - Removing privileges on test database...
 ... Success!

Reloading the privilege tables will ensure that all changes made so far
will take effect immediately.

Reload privilege tables now? [Y/n] y
 ... Success!

Cleaning up...

All done!  If you've completed all of the above steps, your MariaDB
installation should now be secure.

Thanks for using MariaDB!

After that restart the service using the below command.

#systemctl restart mariadb

We can login the database using root user executing the below command and execute a simple query on database.


#mysql –u root –p
After that type the root password and enter the SQL promt.
[root@localhost ~]# mysql -uroot -p
Enter password:
Welcome to the MariaDB monitor.  Commands end with ; or \g.
Your MariaDB connection id is 12
Server version: 5.5.60-MariaDB MariaDB Server

Copyright (c) 2000, 2018, Oracle, MariaDB Corporation Ab and others.

Type 'help;' or '\h' for help. Type '\c' to clear the current input statement.

MariaDB [(none)]> show databases;
+--------------------+
| Database           |
+--------------------+
| information_schema |
| mysql              |
| performance_schema |
+--------------------+
3 rows in set (0.00 sec)

To change MariaDB port

Suppose we are going to change MariaDB port from 3306 to 7706,to change the default port we need to open /etc/my.cnf file and add the below line.
[mysqld]
Port = 7706

After that restart the service using the below command.
#systemctl restart mariadb

After that allow the firewall access for new port. To allow the access in firewall we execute the below commands.

#firewall-cmd  -- permanent  -- add-port=7706/tcp
#firewall-cmd  -- reload

Recommended Read: https://techrideradmin.blogspot.com/2018/10/iptables-firewall-rule-chains-configuration-guide-on-linux-with-examples-for-beginners.html

 That’s all if this article is helpful please share it!!!!!!!!

Simple step by step guide to redirect HTTP TO HTTPS in APACHE on RHEL/Centos/Oracle linux (5-6-7)


In this article we learn how to redirect HTTP to HTTPS in APACHE on linux. Https is used to transfer data over internet securely. To enhance the security we need to force redirection from http to https.

To do this redirection first we need to configure SSL Certificate in the linux sytem and we need to enable one module mod_rewrite. If this module is not enable in linux system we need to edit apache configuration file and enable the mod_rewrite module.

Method to redirect HTTP TO HTTPS in APACHE  on RHEL/Centos/Oracle linux (5-6-7)

We have two method to redirect HTTP to HTTPS in APACHE on linux system.

METHOD1: we edit the APACHE configuration file and add the below line.suppose our domain name is www.example.org

Redirect permanent / https://www.example.org/

METHOD2: We edit the APACHE configuration file and also add the below lines under the Document Root section

  RewriteEngine On
  RewriteCond %{HTTPS} off
  RewriteRule (.*) https://%{HTTP_HOST}%{REQUEST_URI} [R,L]

Simple step by step guide to redirect HTTP TO HTTPS in APACHE  on RHEL/Centos/Oracle linux (5-6-7)

Simple step by step guide to redirect HTTP TO HTTPS in APACHE  on RHEL/Centos/Oracle linux (5-6-7)


Recommended Read: https://techrideradmin.blogspot.com/2018/12/simple-step-by-step-guide-to-configure-SSL-for-APACHE-webserver-in-linux-RHEL-Centos-Oracle-5-6-7.html

Now restart the APACHE webserver using the below command
For linux(5/6)
#service httpd restart
For linux7
#systemctl restart httpd

Now open the browser and type http://server ipaddress  and it will be redirect to https.

That’s all if this article is helpful to know about redirect http to https please share this  article!!!!!!!