In this
article we learn how to configure MySQL Master Slave replication setup on
linux.For this we have two server one is master server and other is slave
server. We have to install MySQL on both node.
Master server ip
address==========192.168.137.4
Slave server ip
address===========192.168.137.3
Configuration Master server for Master-Slave replication
To configure Master server for
Master slave configuration first we need to open the my.cnf file and add the
below lines into the files.
server-id = 1
log-bin = /var/lib/mysql/mysql-bin
binlog-do-db=techrideradmin
From the above lines you need to
change the bolded database name as per your requirement.
To take effect the config file we
need to restart the mysql service using the below command.
[root@masterdb ~]#
service mysqld restart
Stopping mysqld:
[ OK ]
Starting mysqld:
[ OK ]
After that we need to configure
slave user and grant the permission for replication using the below command through
mysql promt.
mysql> GRANT
REPLICATION SLAVE ON *.* TO 'slave_techuser'@'%' IDENTIFIED BY 'password';
Query OK, 0 rows
affected (0.00 sec)
mysql> FLUSH
PRIVILEGES;
Query OK, 0 rows
affected (0.00 sec)
After lock the database to pevent
the new changes using the below command.
mysql> FLUSH TABLES
WITH READ LOCK;
Query OK, 0 rows
affected (0.00 sec)
To know the file name and position
we need to execute the below command which is required to configure slave part.
mysql> SHOW MASTER
STATUS;
+------------------+----------+----------------+------------------+
| File | Position | Binlog_Do_DB | Binlog_Ignore_DB |
+------------------+----------+----------------+------------------+
| mysql-bin.000001
| 106 | techrideradmin | |
+------------------+----------+----------------+------------------+
1 row in set (0.00
sec)
After that take backup of master
database using the below command.
[root@masterdb ~]#
mysqldump -u root -p techrideradmin > /backup/techrideradmin.sql
Enter password:
After taking backup we need to
unlock table using the below command.
mysql> UNLOCK
TABLES;
Query OK, 0 rows
affected (0.00 sec)
mysql> quit
Bye
Copy the backup dump to the slave
server using the below command.
[root@masterdb ~]# scp
/backup/techrideradmin.sql root@192.168.137.3:/slave
Configuration Master server for Master-Slave replication
Open the
mysql configuration file which is located at “/etc/my.cnf” and add the below
lines.
server-id=2
master-host=192.168.137.4
master-connect-retry=30
master-user=slave_techuser
master-password=password
replicate-do-db=techrideradmin
log-bin
= /var/lib/mysql/mysql-bin
To take effect the config file we
need to restart the mysql service using the below command.
[root@masterdb ~]#
service mysqld restart
Stopping mysqld:
[ OK ]
Starting mysqld:
[ OK ]
Now login the MySQL server
and create techrideradmin database and restore the database using previous
backup file.
mysql>
create database techrideradmin;
Query
OK, 1 row affected (0.00 sec)
Stop the slave using
the below command.
mysql>
stop slave;
Query
OK, 0 rows affected (0.01 sec)
Now restore the dumped
file using the below command.
[root@slavedb
~]# mysql -u root -p techrideradmin < /slave/techrideradmin.sql
Enter
password:
Then execute the below
command to get details from the master server.
mysql>
CHANGE MASTER TO MASTER_HOST='192.168.137.4', MASTER_USER='slave_techuser',
MASTER_PASSWORD='password', MASTER_LOG_FILE='mysql-bin.000001',
MASTER_LOG_POS=106;
Query
OK, 0 rows affected (0.11 sec)
Then execute the below
command to start slave.
mysql>
start slave;
Query
OK, 0 rows affected (0.00 sec)
Then check the status
of slave using the below command.
mysql>
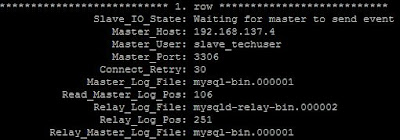
SHOW SLAVE STATUS\G
***************************
1. row ***************************
Slave_IO_State: Waiting for
master to send event
Master_Host: 192.168.137.4
Master_User: slave_techuser
Master_Port: 3306
Connect_Retry: 30
Master_Log_File: mysql-bin.000001
Read_Master_Log_Pos: 106
Relay_Log_File:
mysqld-relay-bin.000002
Relay_Log_Pos: 251
Relay_Master_Log_File: mysql-bin.000001
Slave_IO_Running: Yes
Slave_SQL_Running: Yes
Replicate_Do_DB: techrideradmin
 |
| How to configure MySQL Master-Slave replication setup on Centos/RHEL/Oracle server step by step guide |
That’s all.
Master-Slave replication has been configured successfully if this aticle is
helpful please share it!!!


Please Donate To Bitcoin Address: [[address]]
Donation of [[value]] BTC Received. Thank You.
[[error]]

0 comments:
Post a Comment